DocumentationEverything you need to get the most of our web Server Control Panel
Introduction
Discover the capabilities of our WebServer Control Panel: Effortlessly manage databases, build and deploy staging websites, toggle opcode caching, clone existing sites with ease, and seamlessly transfer websites and emails from cPanel to our advanced platform.

Add Website
Whether you just bought a new domain or want to import a new domain, follow this easy step by step guide.

Emails
Setting up new email accounts and accessing webmail is easy with our control panel. You can quickly create email accounts, adjust settings, and access webmail—all through a user-friendly interface.

Packages
Our hosting provider offers a range of packages tailored to various needs, from basic to advanced, ensuring reliable and secure hosting for any website. With our flexible plans, you can easily upgrade as your site grows, ensuring your hosting always meets your evolving requirements.

Users
Vores kontrolpanel gør det nemt at tilføje brugere og tildele dem roller. Du kan let administrere adgang ved at oprette brugerkonti og definere deres tilladelser, fra grundlæggende visningsrettigheder til fuld administrativ kontrol.

Integrations
Kontrolpanelet tilbyder integration med Cloudflare DNS for at forbedre hjemmesiders ydeevne og sikkerhed. Denne lette opsætning giver hurtigere indlæsningstider og øget beskyttelse.
Table of Contents
Introduction
Maximize your web hosting capabilities with our user-friendly WebServer Control Panel:
- Database Management: Effortlessly add, remove, and manage databases.
- Staging Websites: Build and deploy websites with one-click staging.
- Opcode Caching: Optimize site speed with simple caching controls.
- Clone Website: Quickly duplicate any site with a single click.
- cPanel Importer: Smoothly transfer websites and emails from cPanel.
- Email Setup: Easily create and manage email accounts.
- Webmail Access: Directly navigate to webmail for quick access.
- User Roles: Add users and assign roles for team collaboration.
- Cloudflare Integration: Enhance site performance and security with Cloudflare DNS.
Our platform streamlines your hosting process, from website creation to advanced integrations, ensuring a hassle-free experience.
Add Website
Add a New Domain to Our WebServer Control Panel :
Great choice on acquiring your new domain! Let’s get it up and running with our hosting services. Here’s a simple step-by-step guide to add and connect your domain to our website:
Prerequisites:
- Domain name
Step-by-Step Guide:
Adding your website :
Once you’re logged in Hostious dashboard :
- Click on “websites” section then choose “Add WordPress Site”

P.S Check “Make this website a staging site” if you want to create a staging website on which you can test and implement new modifications.
2- Add WordPress installation path : For a WordPress website, the installation path typically depends on how you want your WordPress site to be accessed.

- Leave Installation blank if you want WordPress to be your main website.
- Add /blog or /path if you want WordPress in a subdirectory of your site.
Add /blog or /path if you want WordPress in a subdirectory of your site.
3. Add credentials to log in and manage your wordpress website :

Then Click on Add.
4- Point Your Domain to our servers :
To Update your domain’s DNS settings to point to our servers.
Here are the Specific instructions on how to do this :
- 4.1 Log Into Your Domain Registrar Account:
- Access the account where your domain is registered.
- 4.2 Navigate to Domain Management:
- Locate the section where you can manage your domain settings.
- 4.3 Select Your Domain:
- Choose the domain you wish to update.
- 4.4 Access Nameserver Settings:
- Find the option to change or edit your nameservers.
- 4.5 Update Nameservers:
- Replace existing nameservers with ns1.hostious.io and ns2.hostious.io.
- Save or confirm the changes.
Check after a few hours (up to 48) to ensure the nameservers have updated successfully and Verify the connection. Once the DNS changes propagate, your domain should be live and connected to our hosting.
How to Add Your Existing Website to Our WebServer Control Panel :
Are you considering a new home for your existing website? Our platform provides enhanced performance, robust security, and user-friendly management tools to elevate your website’s potential. Transferring your site to us is a FREE & straightforward process, and we’re here to guide you every step of the way.
Prerequisites:
- Domain name
- Access to the control panel Cpanel
Step-by-Step Guide:
Once you’re logged in Hostious dashboard :
- Click on Website importer section then on New Import.
- Download a backup of your site via your actual Cpanel*

3. Generate a full account backup in your cpanel interface. Save the tar.gz file to your desktop.
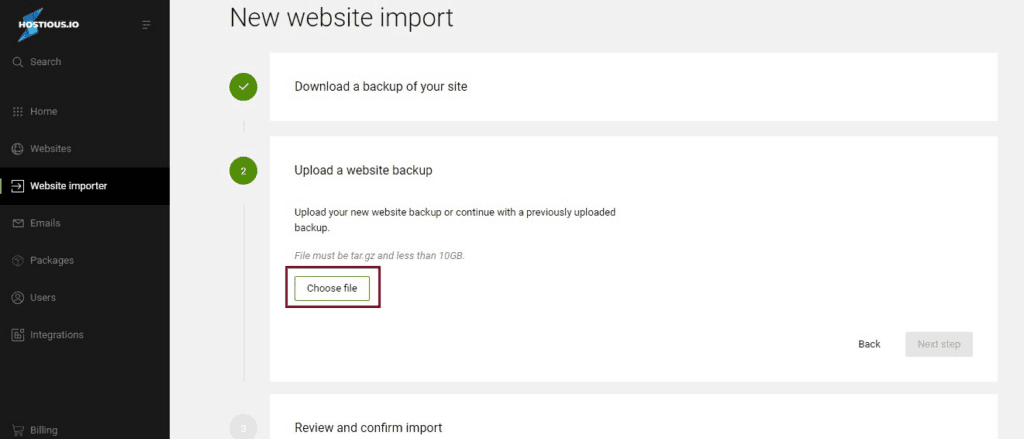
4. Upload your backup and click next. If you have previously uploaded a backup you will see this backup listed to the left.
5. Once the page loads. Check for any conflicts (Any conflicts that are blocking your website import will be highlighted in the red modal)
6. Select Import now to finish
*To access your current cpanel. Log in to your website host , i.e Namecheap or Godaddy. Under “Account” -> “Hosting List”, you’ll be able to log in into your Cpanel.
If you encounter any trouble or difficulties during the installation process, please don’t hesitate to contact our live customer support team. They are ready to assist you and will help ensure your installation is completed smoothly and efficiently.
Cpanel Importer
Hostious’s ‘cPanel importer’ tool allows you to migrate a cPanel account to Hostious.
A cPanel import to Hostious will restore a full cPanel account backup. Websites should work exactly as they did on cPanel. Some proprietary features available on cPanel are not supported on Hostious, these tools will not be copied across.
The following will be imported:
- Primary website
- Sub, add-on and parked domains will become mapped domains within a single website
- All files
- All database
- Any installed applications
- All email accounts
- All forwarders-only accounts
- Any existing SSL certificate
- Cron jobs
- FTP accounts
The following proprietary tools are not supported on Hostious:
- Postgres databases
- Wildcard subdomains
- Mailman settings
- Directory privacy
- PostgreSQL databases
- Catch all email addresses
- Autoresponders
- Calendars and contacts`
- Existing statistics
- Error pages
The Hostious cPanel importer is compatible with full cPanel account backups generated on versions 102 LTS, 104, 106, 108
Importing a cPanel backup
If any domains you are importing already exist in your Hostious account, you will need to delete these to proceed with the import.
Installing WordPress
Install on a new website
To install WordPress on a new website, ‘Allow software installer’ must be enabled on the hosting package.
To install WordPress on an new website:
- Open Websites in the left sidebar
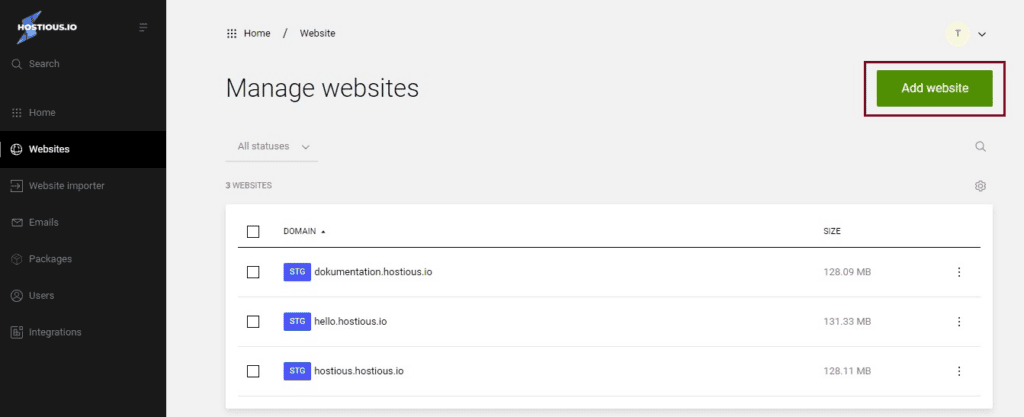
2. Select Add website
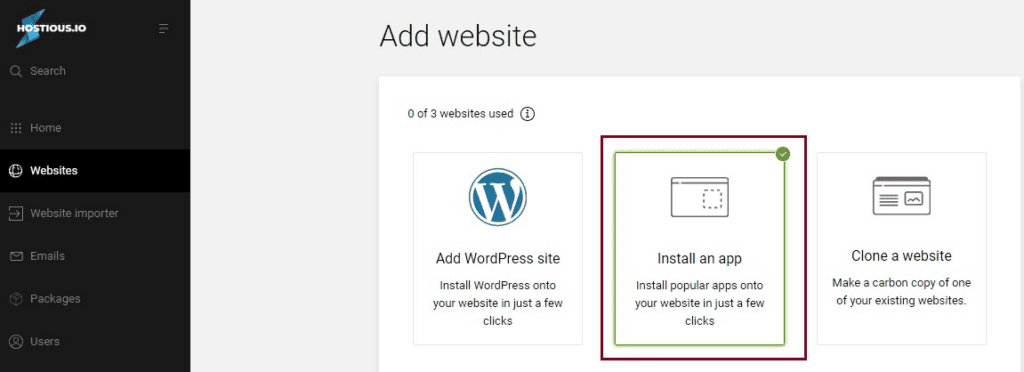
3. When the form loads select Install an app.
4. Complete the form and select Add to finish.
Install on an existing website
To install WordPress on an existing website, ‘Allow software installer’ must be enabled on the hosting package.
To install WordPress on an existing website:
- Open Websites in the left sidebar
- Select the website you would like to install WordPress on
- When the website dashboard loads select Apps in the top navigation

4. Select Install app
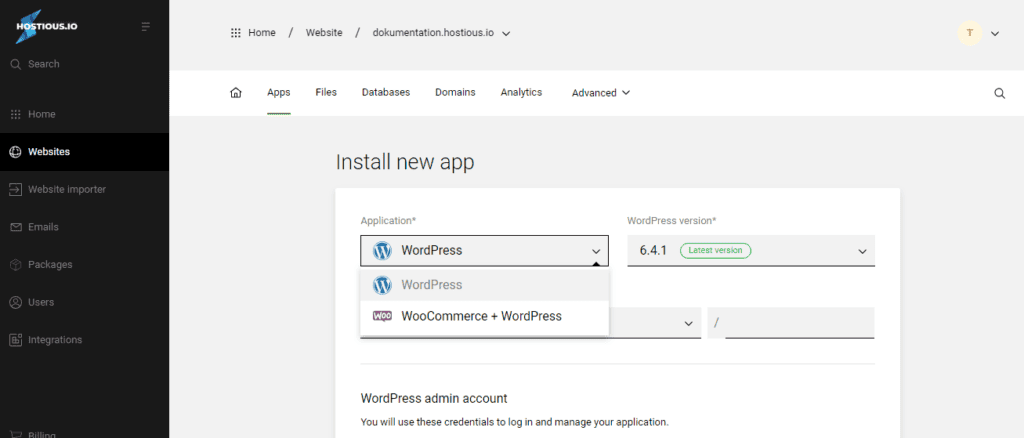
5. Complete the form and select Add to finish
Domains Extra
To add a addon, alias or subdomain:
- Open Websites in the left side bar
- Select the website you would like to add the domain to
- When the website dashboard loads select Domains in the top navigation
- Select Add domain
- Select the domain type
- Complete the form and click Add to finish
Change primary domain:
The primary domain is the main domain on a website, Hostious uses the primary domain when the website is referenced in the UI.
To change your websites primary domain:
- On the Website dashboard click Domains
- Locate the domain you would like to make primary and select the drop down menu
- Select Make primary
- Click Save to finish
Redirects
To add a redirect:
- Open Websites in the left side bar
- Select the website you would like to add the redirect to
- On the Website dashboard click Advanced then Redirects
- Select Add redirect
- Select the redirect status:
- To specify a permanent redirection, select 301
- To specify a temporary redirection, select 302
- Select the Domain and Destination URL
- Click Add to finish
- Q: How long will it take for my domain to become active after I update the nameservers?
- A: The propagation of nameserver changes can take anywhere from a few hours to up to 48 hours. During this time, your domain may not be immediately accessible. We recommend checking periodically to see when the update takes effect.
- Q: Can I transfer my website to Hostious without experiencing downtime?
- A: Yes, you can minimize downtime by preparing your site on our hosting platform before updating the domain’s DNS settings. Once everything is set up and tested, updating the DNS will direct traffic to the new hosting with minimal disruption.
- Q: What should I do if I can’t access my domain registrar’s account to update the nameservers?
- A: If you’re unable to access your domain registrar account, you should contact their customer support for assistance. They can help you regain access or update your nameserver settings on your behalf.
Emails
Add a mailbox/forwarder-only
- Open Email in the left side bar
- Select Add account
- When the form loads, input the email address and select the type of account you would like to create (mailbox or forwarder only)

- Complete the form
- Click Add to finish
Alternatively you can access your webmail by visiting mail.{customer_domain}
Email authentication
Email authentication (or email validation) is a collection of protocols used to verify the source and legitimacy of email messages.
SPF (Sender Policy Framework) is a form of email sender authentication. It validates if an email was sent from an authorized IP address. An SPF record is automatically added to every domain.
DKIM (DomainKeys Identified Mail) is a form of domain authentication that signs the message and verifies it was sent from the source domain. DKIM can be enabled on a per domain basis.
To enable DKIM on a domain:
- Open Websites in the left side bar
- Select the website you would like to enable DKIM
- Select Domains from the top menu and select the domain you would like to enable DKIM on

4. Scroll to “Email authentication” and toggle DKIM On

5. If the DNS is hosted with Hostious, wait for validation. If the DNS is hosted elsewhere, follow the instructions on screen to complete authentication.
Each Hostious client can send messages through SMTP and receive them with POP/IMAP. The username is always their email address.
Packages
Discover why Hostious stands out in the hosting market. Our comparison chart pits our services against some of the best, focusing on the most affordable plans from four different providers. This clear overview, available on our competition comparison page, will help you see the value and advantages we offer. Whether you’re in doubt or looking for a superior hosting solution, this comparison is an essential tool for making an informed decision.

Users
Adding a New User:
1. Log in to the Hostious dashboard.
2. Navigate to the “Users and roles” section.
3. Click on the “Invite user” button.

4. In the “Invite new user” form, fill in the “Full name” and “Email address” of the new user.
5. Select the appropriate user role(s) from the options provided:
– Super admin: Has unrestricted access.
– Collaborator: Can manage the website(s) they have been granted access to.
6. Once all details are filled in, click the “Invite” button to send an invitation to the new user.

Managing Users and Roles:
- To modify roles or details of an existing user, locate the user in the “Users and roles” list.
- Click on the “…” (more options) button next to the user’s name.
- From the drop-down menu, choose to edit user details or roles.
- Make the necessary changes in the user’s profile and save.
Integrations
Hostious DNS and Cloudflare
Hostious’s Cloudflare integration allows you to synchronize your domain’s DNS with Cloudflare. This guide will explain how to set up Cloudflare with Hostious.
Adding Cloudflare to a domain
Connecting Cloudflare to a domain in your Enhance account will automatically sync all existing records in your Cloudflare account with the DNS records set in your Enhance account.
To connect Cloudflare with a domain in your account:
- Click Manage on the domain you would like to connect
- At the top of the screen, beneath your domain you will see a Cloudflare selector. In the drop down select the token you would like to link.
- Open Integrations in the left sidebar.
- Click Add to connect your Cloudflare account and follow the steps.

A Cloudflare API token can not be connected to staging domains
To use Cloudflare, you need to point the nameservers for your domain to Cloudflare’s. You can change your nameserver where you have registered you domain.
DNS settings
The proxy status of a DNS record affects how Cloudflare treats incoming traffic for that record.
To disable/enable Cloudflare’s proxy on a DNS record:

- Visit Domains and navigate to the ‘DNS records’ card
- On the relevant record, select Edit in the menu
- Toggle Proxy status and click Save to finish
The WordPress toolkit:
Access the WordPress toolkit :
To access your WordPress toolkit, follow these two steps:
- Go to the Websites section within your web control dashboard on Hostious, and choose the website or staging website you wish to manage.
2. Click on Manage next to the WordPress installation for the selected website.
What’s Included in the WordPress toolkit:
A powerful WordPress toolkit is bundled free with the Hostious control panel.
The WordPress toolkit provides a feature rich management interface that allows each of our users to update and manage WordPress installations without having to leave the Hostious control panel.
- Pre- install application – this will automatically install WordPress on each website added. You will be prompted to create a WordPress admin at point of creation.
- Plugin manager – this allows you to activate, deactivate, disable, enable, update and delete plugins from within the Hostious panel.
- WordPress admin lockdown – this allows you to restrict access to your wp-admin by IP address.
- WordPress user manager – this allows you to add, update and delete additional WordPress users from within the Hostious panel.
- WordPress SSO – this allows you to edit the default SSO login and access the wp-admin from the Hostious control panel without having to enter your login credentials.
- Pre-install plugins – Selected plugins will be pre-installed on each installation of WordPress. Plugins which are available for pre-installation include Wordfence, Yoast SEO and LiteSpeed Cache.
- Debugging – this allows you to toggle on/off WP_DEBUG, WP_DEBUG_LOG and WP_DISPLAY.
Set PHP
To change a website’s php version:
- Open Websites in the left side bar
- Select the website you would like to update the php version on
- When the website dashboard loads select Advanced in the top navigation
- Select Developer tools

5. Scroll to PHP

6. Select preferred PHP version from the drop down

7. A confirmation modal will load. Select Update to finish.

The IonCube loader is not available on PHP 8.0
Restart PHP
Each primary website on Hostious has its own PHP container. It’s possible to restart this container without affecting other websites in your Hostious account.
Restarting a website’s PHP container will reload the php.ini and redis.conf for that site and its addon, aliases and subdomains. It will also terminate any stuck PHP workers and allow new requests to be served.
To restart a website’s php container:
- Open Websites in the left sidebar.
- Select the website you would like to update the php version on.
- When the website dashboard loads, select Advanced from the top navigation.
- Select Developer Tools.

5. Scroll to PHP

6. Under Restart PHP container click Restart

7. A confirmation modal will load. Select Restart.
The website will be offline while the PHP service restarts.

Ioncube
The IonCube loader can be enabled on a per website basis. This setting is disabled by default.
If you have previously enabled the Ioncube loader manually on a website, we recommend removing the php.ini directive prior to enabling the Ioncube loader in the Hostious UI.
To enable the Ioncube loader on a website:
- On your Hostious dashboard, select Advanced and then Developer Tools.

2. Scroll down to IonCube loader.

3. Toggle IonCube On
The IonCube loader can not be enabled on websites using php 8.0 or 8.2. This is a restrection enforced by IonCube.

Redis
Redis can be enabled on a per website basis. This setting is disabled by default. Once enabled, you will be provided with connection details and will be able to configure the redis.conf through the Hostious UI.
In order to enable/disable Redis, Redis must be enabled on the website’s hosting package.
To enable Redis on a website:
- On your Hostious web control panel dashboard select Advanced then Developer tools.

2. Scroll to Redis.

3. Toggle Redis On.
OPcache
How OPcache or PHP Opcode Caching Works?
When a PHP script executes, your server’s cache memory is checked to see if the script has already been cached. If it hasn’t, it’s parsed, which means the code is analyzed.
Then, the script is compiled into opcode making the file readable by the server. Once that’s done, the opcode is saved to the server’s memory.
In other words, it’s stored in your server’s cache. The next time a visitor loads the page with the PHP script, the cached code is executed and loaded much faster.
On the other hand, if the script is loaded on the page and the cache is checked for opcode and finds it, then it’s loaded lickety-split.
If you have PHP version 5.5 and above, OPcache PHP opcode caching is installed and enabled by default. You don’t have to do anything else. There are also no additional requirements or configurations needed to run it.
To check if OPcache is enabled :
OPcache module is installed on Hostious by default.
- On your Hostious dashboard, select Advanced and then Optimization.
2. Scroll to OPcache.
Contact Us for Troubleshooting
If you are experiencing issues or need assistance, our support team is ready to help you.
When contacting us, please make sure to include as many relevant details as possible, such as your domain name, a description of the problem, and any error messages, so we can assist you quickly and effectively with troubleshooting.

