Boost Your WordPress Site Performance with QUIC.cloud CDN: Setup Guide & Tips
Is your WordPress site slow? Are you looking to speed up your site and keep it secure?
QUIC.cloud CDN is here to help. This guide will walk you through the steps to set up QUIC.cloud for your WordPress site and optimize your settings for the best performance.
Let’s get to it!
What is QUIC.cloud?
QUIC.cloud is a powerful CDN (Content Delivery Network) designed to make your WordPress site faster and more secure.
It works by caching your site’s content on multiple servers around the world, ensuring that your site loads quickly no matter where your visitors are located.
In addition to speeding up your site, QUIC.cloud offers advanced features like DDoS protection and image optimization.
Direct Benefits of Using QUIC.cloud CDN
- Faster Load Times: QUIC.cloud reduces the distance data travels, ensuring your site loads quickly for visitors globally.
- Improved Security: With features like DDoS protection and SSL/TLS support, QUIC.cloud helps keep your site safe from attacks.
- Easy Integration: Setting up QUIC.cloud with your WordPress site is straightforward, and the platform offers numerous optimization options.
QUIC.cloud vs. Cloudflare: Which CDN to Choose in 2024?
Choosing the right CDN for your WordPress site can significantly impact your site’s speed and security. Both QUIC.cloud and Cloudflare are excellent options, but they have distinct features that cater to different needs. Here’s a detailed 2024 comparison to help you decide which CDN is best for your site.
Key Features and Differences
QUIC.cloud CDN Key Features
- Integration with LiteSpeed : QUIC.cloud is specifically optimized for WordPress sites using LiteSpeed servers. It works seamlessly with the LiteSpeed Cache plugin, providing dynamic caching and critical CSS generation.
- HTTP/3 and QUIC Protocol: Offers end-to-end HTTP/3 support, which enhances user performance through multiplex connections.
- Dynamic Content Caching : Caches both static and dynamic HTML pages, making it ideal for sites with frequently changing content.
- Image Optimization : Automatically optimizes images for faster load times.
- Free Plan : Provides a fair allocation of free monthly traffic, with more available if you use LiteSpeed servers.
Cloudflare Key Features
- General-Purpose CDN : Works with a variety of web servers, not just LiteSpeed. Offers extensive security features, including DDoS protection and bot mitigation.
- Automatic Platform Optimization (APO): Enhances performance for WordPress sites by caching dynamic content, available for $5/month on the free plan.
- Global Network : Has a large number of data centers worldwide, ensuring fast content delivery.
- Additional Features : Provides SSL/TLS support, DNS management, and lossless image optimization.
- Free Plan : Also offers a free tier with substantial features and the option to upgrade for more advanced tools.
2024 Quic.cloud vs Cloudflare Recap
Here’s a quick reference table to help you decide when to use each CDN:
| Criteria | QUIC.cloud CDN | Cloudflare CDN |
|---|---|---|
| Best for | Sites using LiteSpeed servers and WordPress | General-purpose sites and high-security needs |
| Dynamic Content Caching | Yes | With APO ($5/month) |
| Static Content Caching | Yes | Yes |
| HTTP/3 Support | Yes | Yes |
| Image Optimization | Yes | Yes |
| DDoS Protection | Basic | Advanced |
| Integration | Tight with LiteSpeed | Broad compatibility |
| Free Plan | Generous for LiteSpeed users | Available with limitations |
When deciding between QUIC.cloud CDN and Cloudflare, consider your specific needs:
✅ If you’re using a LiteSpeed server and need tight integration with WordPress, QUIC.cloud is an excellent choice.
✅ If you need broader compatibility, advanced security features, or are not using LiteSpeed, Cloudflare is a strong contender.
Both CDNs can significantly boost your site’s performance and security. Choose the one that best fits your setup and requirements.
1. Step-by-Step Guide to Setting Up QUIC.cloud CDN
Part 1: Pairing WordPress & QUIC.cloud
Congratulations on deciding to optimize your WordPress site with QUIC.cloud! If you’ve chosen Cloudflare instead, check out our Best Cloudflare settings for wordpress ( Setup and step-by-step guide) for detailed instructions.
For those sticking with QUIC.cloud, let’s dive into the step-by-step process to get your site up and running with enhanced speed and security.
Prerequisites
Before we start, make sure you have:
- Control over your domain’s DNS settings.
- LiteSpeed web server with your hosting provider.
- Installed and configured WordPress.
- Installed and configured the LiteSpeed Cache Plugin.
Since QUIC.cloud is integrated with the LiteSpeed Cache Plugin for WordPress, you’ll need to pair your WordPress site with your QUIC.cloud account.
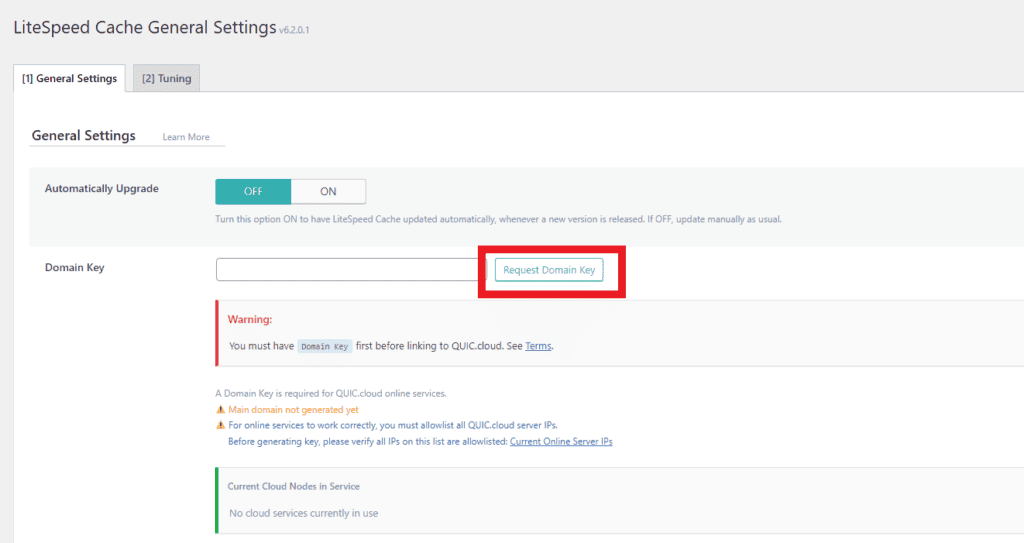
Step 1: Request a Domain Key
- Open your WordPress dashboard (/wp-admin) and navigate to the LiteSpeed Cache plugin’s “General” section.
- Click the “Request Domain Key” button to generate a key for your domain.
- Wait a minute or two and refresh the page. You should see a congratulatory notice indicating that the key has been issued.
Step 2: Link to QUIC.cloud
- Click the “Link to QUIC.cloud” button. This opens a new tab where you’ll be prompted to log in or sign up for a QUIC.cloud account.
- Enter your email address and click “Sign in/up.” Follow the prompts to complete the registration, including setting a password and agreeing to the terms of service.
- Confirm your account via the validation email sent to you.
- After confirming, return to your WordPress Dashboard and click the “Visit My Dashboard on QUIC.cloud” button.
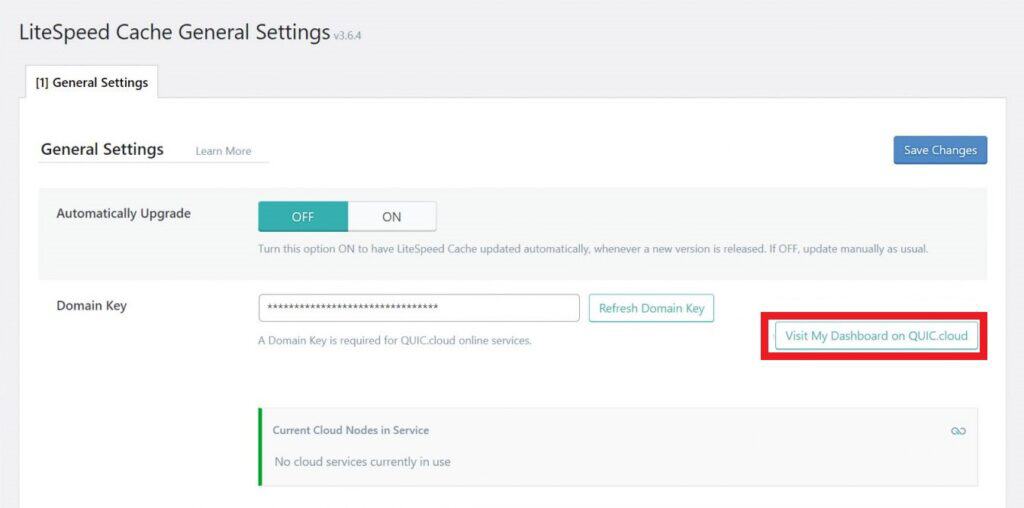
Congratulations! Your WordPress site is now paired with your QUIC.cloud CDN account
Part 2: Configuring the CDN
Before using QUIC.cloud’s CDN, you must properly configure your DNS settings.
Step 1: Enable QUIC.cloud CDN in LiteSpeed Cache Plugin
- Navigate to the CDN section of the LiteSpeed Cache Plugin.
- Find the QUIC.cloud CDN option and switch it to “On.” Click “Save Changes” button.
Step 2: Enable CDN in QUIC.cloud Dashboard
- Open your QUIC.cloud Dashboard. You’ll see a list of the domains linked to your QUIC.cloud account.
- Click on the domain you want to set up.
- Select the “CDN” option in the list of services.
- Click the “Enable CDN” button.

Step 3: Choose QUIC.cloud DNS
- You will be presented with three options. Choose “I want to use QUIC.cloud DNS” and click the “Confirm Choice” button.
- QUIC.cloud will scan and replicate your DNS records.
Step 4: Review and Add DNS Records
- Review the list of DNS records that QUIC.cloud has copied.
- Click the “+ Enable and Add Records” button to proceed.
Step 5: Update Nameservers
- Note the nameservers provided by QUIC.cloud CDN.
- Log in to your domain registrar and update the nameservers for your domain to the ones provided by QUIC.cloud.
- Return to the QUIC.cloud DNS Setup page and click the “Refresh Status” button. It may take up to 48 hours for the changes to propagate, but it typically happens faster.
And that’s it! Your WordPress site is now optimized with QUIC.cloud CDN, ready to deliver faster load times and improved security.
2. Optimizing QUIC.cloud Settings for Speed
After setting up QUIC.cloud, it’s essential to optimize its settings to maximize your WordPress site’s speed and performance. Here’s how you can enable key features like Critical CSS, Unique CSS, Viewport Images, and Low-Quality Image Placeholders.
Enabling Critical CSS and Unique CSS
Critical CSS (CCSS) and Unique CSS (UCSS) are crucial for improving load times by optimizing how CSS files are handled and delivered.
Enable Critical CSS:
- Access LiteSpeed Cache Plugin: Open the LiteSpeed Cache plugin in your WordPress dashboard.
- Navigate to CSS Settings: Go to LiteSpeed Cache > Page Optimization > CSS Settings.
- Enable Load CSS Asynchronously: Turn this setting on to allow asynchronous loading of CSS.
- Enable Critical CSS (CCSS): Turn on the setting and, if needed, enable CCSS Per URL for more granular control.
Enabling CCSS ensures that the critical CSS needed for above-the-fold content is loaded quickly, reducing the time visitors spend waiting for the page to render correctly.

Enable Unique CSS:
- Navigate to CSS Settings: In the LiteSpeed Cache plugin, find the CSS Settings section.
- Enable CSS Combine: Turn on CSS Combine to merge CSS files.
- Enable Generate UCSS: Turn this setting on to create unique CSS for each page.
- Enable Cache Mobile: Navigate to LiteSpeed Cache > Cache and turn on Cache Mobile to generate separate UCSS for mobile and desktop views.
By enabling UCSS, you ensure that only the necessary CSS is loaded for each page, reducing the amount of unused CSS and improving load times.

Setting Up Image Optimization
Optimizing images is a critical step in improving your site’s load speed. QUIC.cloud CDN provides advanced features like Low-Quality Image Placeholders (LQIP) and Viewport Images (VPI) to enhance image delivery.
Enable Low-Quality Image Placeholders (LQIP):
- Access Media Settings: Go to LiteSpeed Cache > Page Optimization > Media Settings.
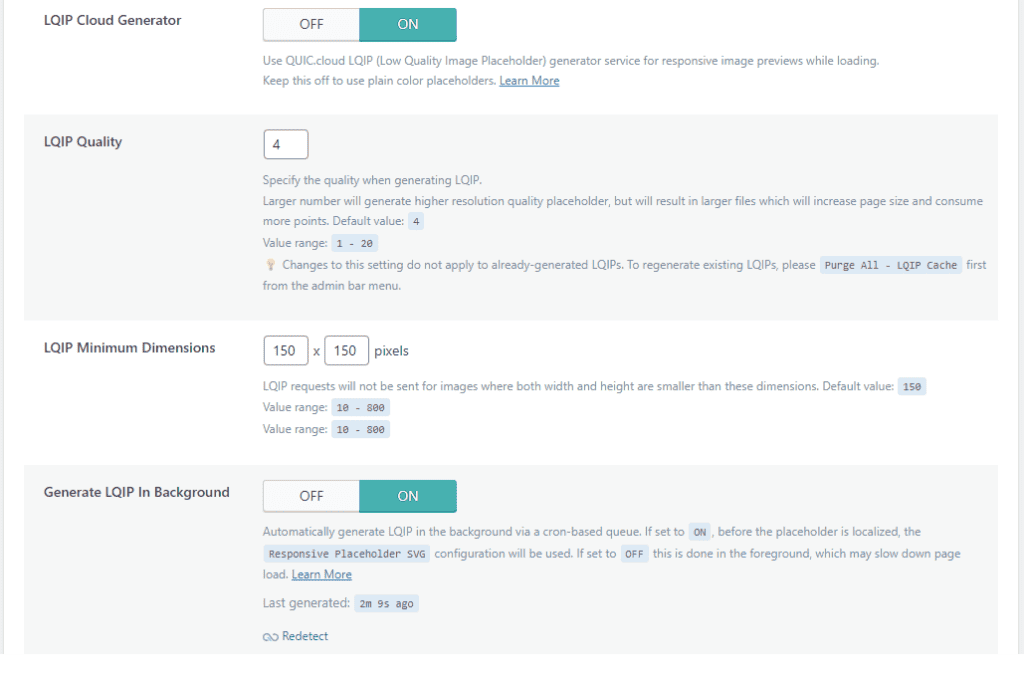
- Enable Lazy Load Images and Responsive Placeholders: Turn these settings on to delay image loading until needed and use responsive placeholders.
- Enable LQIP Cloud Generator: Turn on the LQIP Cloud Generator to replace gray placeholder boxes with low-quality versions of the original images.
LQIP helps improve the visual loading experience by showing low-quality placeholders before the actual images load, making the site appear faster.
Enable Viewport Images (VPI):
- Navigate to Media Settings: In the LiteSpeed Cache plugin, go to the Media Settings section.
- Enable Lazy Load Images: Ensure Lazy Load Images is turned on.
- Enable Viewport Images: Turn on Viewport Images to exclude above-the-fold images from lazy loading.
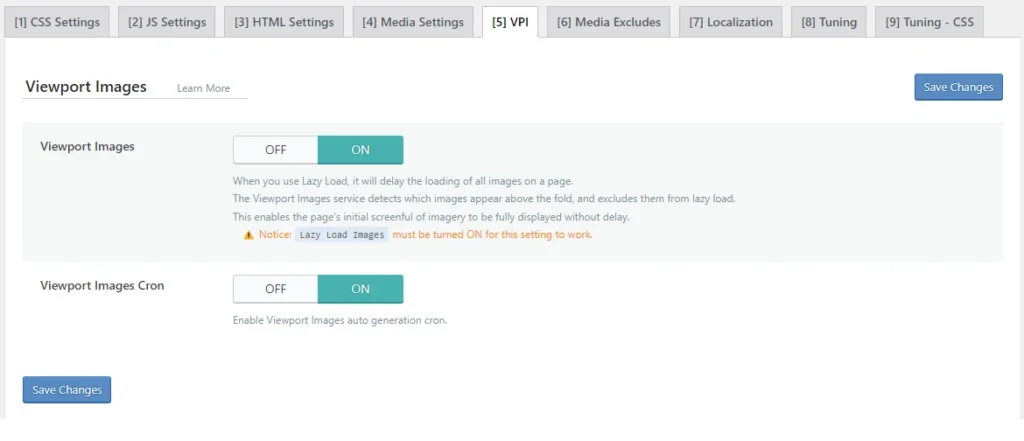
VPI ensures that images in the initial viewport load immediately, providing a better first impression and faster perceived load times.
3. Advanced QUIC.cloud CDN Security Features
To ensure your website is well-protected against malicious attacks, QUIC.cloud offers several advanced security features. Here’s how you can configure and utilize these features for optimal security.
Enabling and Configuring DDoS Protection
QUIC.cloud CDN provides robust protection against DDoS attacks, which is crucial for maintaining your site’s availability and performance during an attack.
Navigate to Security Settings: Go to Security Section: Navigate to CDN > CDN Config > Security.
Anti-DDoS Settings:
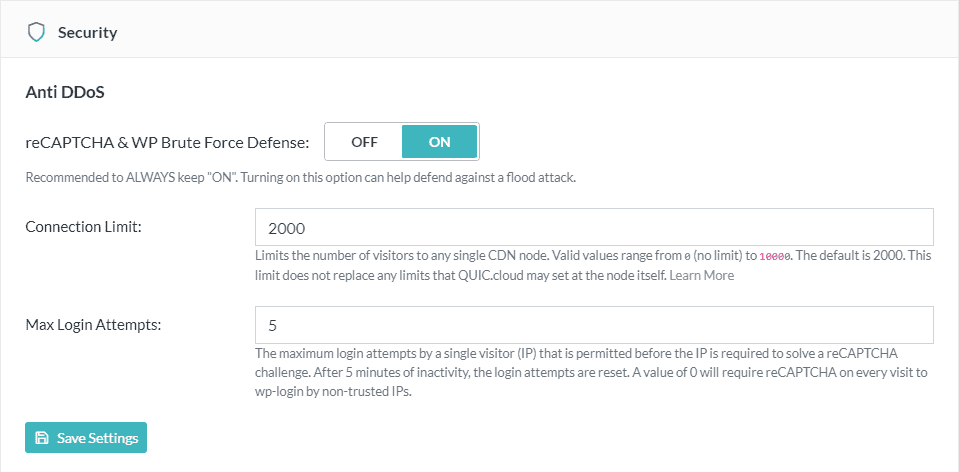
- Enable Anti-DDoS Protection: Turn on the Anti-DDoS feature to protect your site from traffic floods.
- Configure reCAPTCHA Settings: Set up reCAPTCHA to activate based on connection limits and maximum login attempts.
- Connection Limit: Define the maximum number of concurrent connections before reCAPTCHA is triggered. The default is 2000.
- Max Login Attempts: Set the maximum number of login attempts allowed before reCAPTCHA is activated. The default is 10.
URL Flood Protection:
- Enable URL Flood Protection: Protect your site from overwhelming traffic by enabling this feature. It activates reCAPTCHA when a specific URL receives heavy traffic.
Block Brute Force by IP:
- Enable Brute Force Protection: Turn on this setting to block direct login attempts or XML-RPC access by malicious IPs.

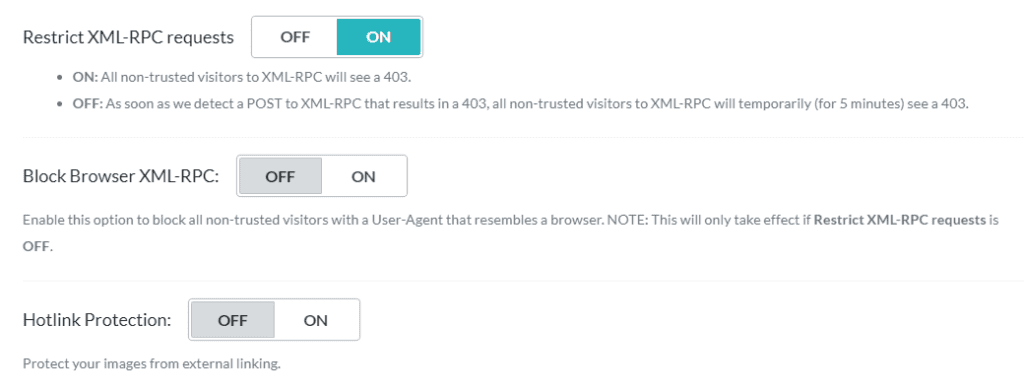
Restrict XML-RPC Requests:
- Enable XML-RPC Restriction: Block POST requests to XML-RPC from non-trusted IPs after detecting suspicious activity.
Hotlink Protection:
- Enable Hotlink Protection: Prevent external sites from linking to your images and other media, reducing bandwidth theft and improving security.
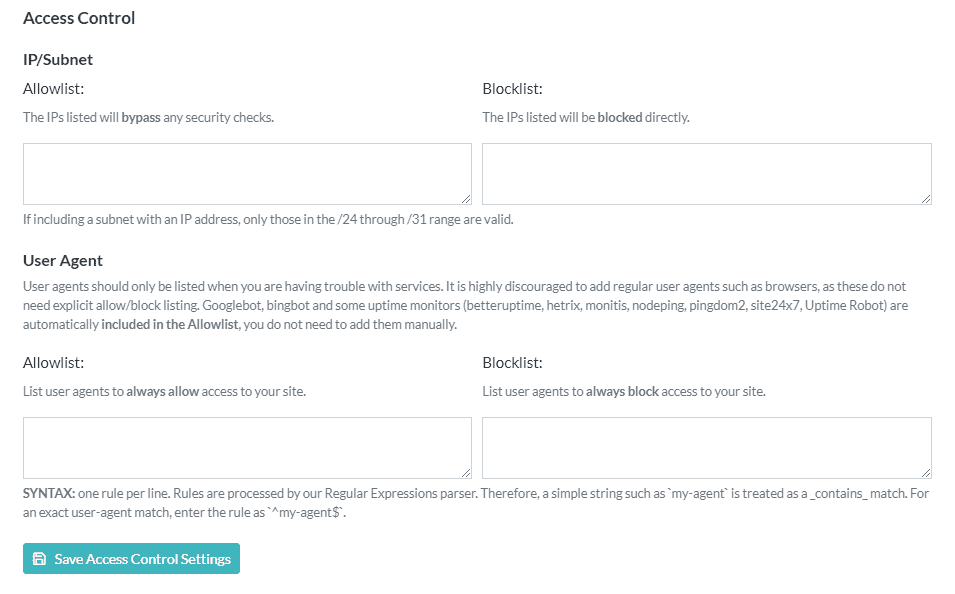
Access Control Settings
QUIC.cloud’s CDN Access Control settings allow you to manage which IP addresses and user agents can access your site.
- IP/Subnet Allowlist and Blocklist:
- Allowlist Trusted IPs: Add trusted IP addresses to the Allowlist to grant them unrestricted access.
- Blocklist Suspicious IPs: Add suspicious or malicious IP addresses to the Blocklist to block their access.
- User Agent Allowlist and Blocklist:
- Allowlist Trusted User Agents: Add trusted user agents to the Allowlist to bypass security checks.
- Blocklist Malicious User Agents: Block user agents known for malicious activities.
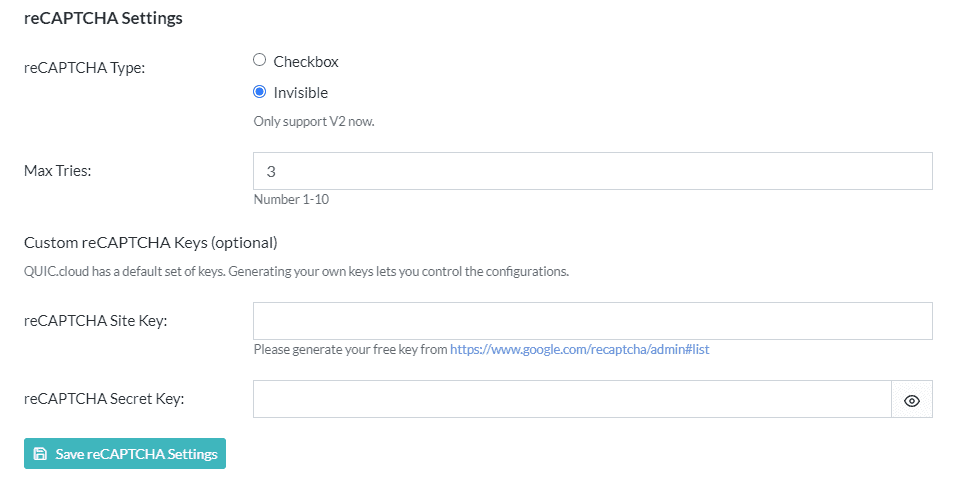
reCAPTCHA Settings
Configure reCAPTCHA to protect your site from automated attacks while ensuring legitimate users can access it easily.
- Select reCAPTCHA Type:
- Choose reCAPTCHA Version: Select between Checkbox or Invisible reCAPTCHA (v2).
- Set Maximum Tries:
- Define Maximum Attempts: Determine how many attempts a user gets to complete the reCAPTCHA challenge. The default is 3.
- Custom reCAPTCHA Keys:
- Enter Custom Keys: Optionally, provide your own reCAPTCHA Site Key and Secret Key for more control over the configuration.
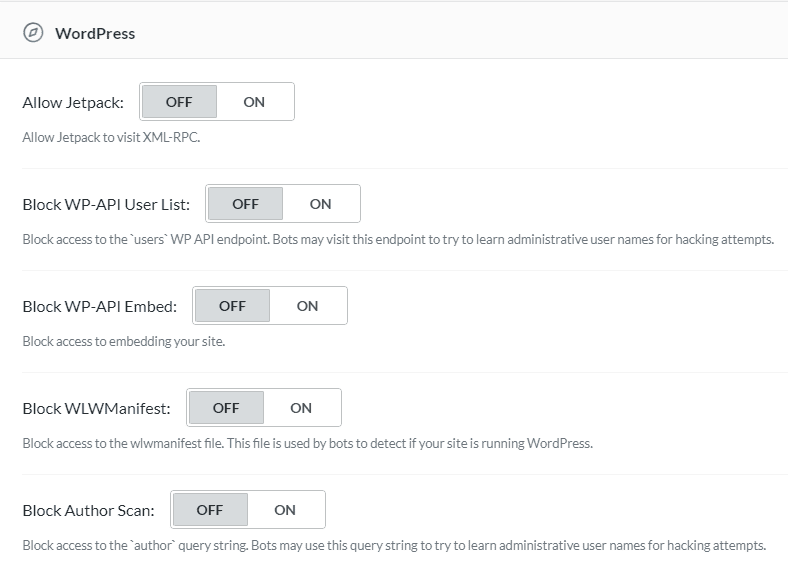
WordPress-Specific Security Settings
QUIC.cloud CDN offers several WordPress-specific security features to enhance the security of your WordPress site.
- Allow Jetpack:
- Enable Jetpack Access: Allow the Jetpack plugin to access XML-RPC.
- Block WP-API User List:
- Prevent User Enumeration: Block access to the WP API endpoint to prevent bots from discovering admin usernames.
- Block WP-API Embed:
- Disable Embedding: Prevent your site from being embedded on other sites.
- Block WLWManifest:
- Hide WordPress Installation: Block access to the wlwmanifest file to prevent bots from detecting your WordPress installation.
- Block Author Scan:
- Protect Author Information: Block access to author information to prevent bots from discovering admin usernames.
By utilizing these advanced security features, you can significantly enhance your site’s protection against various types of attacks, ensuring a secure and reliable experience for your visitors.
Frequently Asked Questions About Quic.Cloud CDN
1. What is the primary benefit of using QUIC.cloud for my WordPress site?
QUIC.cloud offers end-to-end HTTP/3 support and dynamic content caching, which significantly enhances the speed and performance of your WordPress site.
By leveraging LiteSpeed cache, QUIC.cloud can serve both static and dynamic content, ensuring faster load times and a smoother user experience. Additionally, its integration with LiteSpeed servers makes it an optimal choice for websites running on this infrastructure.
2. How do I enable Brotli compression and minification on QUIC.cloud?
Brotli compression and minification can be enabled through the LiteSpeed Cache plugin. Navigate to LiteSpeed Cache > Page Optimization > CSS/JS Settings in your WordPress dashboard. Turn on Brotli Compression, and enable the options for HTML, CSS, and JS minification. This setup will compress your files, reducing their size and improving load times.
3. What are QUIC.cloud’s advanced security features and how do they protect my site?
QUIC.cloud offers robust security features including Anti-DDoS protection, URL Flood Protection, reCAPTCHA integration, and Brute Force Login Defense.
These features help mitigate attacks by limiting excessive connections, challenging suspicious traffic with reCAPTCHA, and blocking malicious login attempts. Additionally, you can control access by creating IP and user agent allowlists and blocklists to further secure your site.
4. How can I monitor and optimize the performance of my site using QUIC.cloud?
QUIC.cloud provides a comprehensive dashboard where you can monitor various performance metrics. By navigating to the QUIC.cloud Dashboard and selecting your domain, you can view analytics related to traffic, caching efficiency, and resource usage.
Regularly reviewing these metrics allows you to fine-tune your settings, such as adjusting cache levels and enabling features like Critical CSS and Unique CSS to enhance performance.
5. Can I use QUIC.cloud in conjunction with Cloudflare, and if so, how?
Yes, you can use QUIC.cloud alongside Cloudflare. While QUIC.cloud excels at caching dynamic content and providing deep integration with LiteSpeed servers, Cloudflare is great for caching static content and offering robust DDoS protection. To set this up, configure your site to use QUIC.cloud for dynamic content and Cloudflare for static content. This combination can maximize your site’s performance and security.
Conclusion
Setting up and optimizing QUIC.cloud CDN for your WordPress site is a powerful way to boost speed, enhance security, and ensure a seamless user experience. By leveraging features like Brotli compression, HTTP/2 and HTTP/3 support, and advanced image optimization, your site will be well-equipped to handle traffic efficiently and securely.
If you’ve followed this guide and successfully implemented QUIC.cloud, you’re on the right path to a faster, more secure website. However, if you’re looking for even more robust performance and dedicated support, consider our hosting services. Our hosting plans are optimized for WordPress and fully compatible with QUIC.cloud, providing you with a seamless integration experience.
Visit our hosting plans page to discover how our high-performance servers and expert support can further enhance your website’s speed and security. Thank you for trusting us with your WordPress optimization journey!

