100% PageSpeed and GTmetrix Scores for WordPress with LiteSpeed Cache Settings
Website speed optimization is crucial for SEO and user experience. Slow-loading websites lead to higher bounce rates, preventing conversions and traffic growth. With the LiteSpeed Cache plugin, you can significantly boost your site’s performance and achieve perfect scores on PageSpeed and GTmetrix.
This guide will walk you through the steps to configure LiteSpeed Cache settings for optimal performance. We have tested these configurations on multiple websites, and the following configurations are the common settings that yielded the best results.
Let’s get to it!
1. LiteSpeed Overview
LiteSpeed is a high-performance web server designed to accelerate websites. It offers an event-driven architecture that handles more traffic with fewer processes, reducing resource usage and improving page speed. LiteSpeed has two editions:
- LiteSpeed Enterprise: Suitable for hosting multiple websites or shared hosting environments.
- OpenLiteSpeed: An open-source version ideal for individual websites.
LiteSpeed Cache is a server-level cache product that optimizes dynamic content on web pages. Available as a plugin for WordPress, it offers advanced caching functionality and optimization features compatible with any web server, including Nginx and Apache.

2. Installing LiteSpeed Cache Plugin
- Log in to your WordPress admin dashboard.
- Go to the Plugins section, search for LiteSpeed Cache, click Install Now, and Activate.
- Refresh the page – the LiteSpeed Cache section will appear on your dashboard.
3. Configuring LiteSpeed Cache Settings
Basic Setup
Before diving into settings, compare performance results before and after activating LiteSpeed Cache to see the improvements.
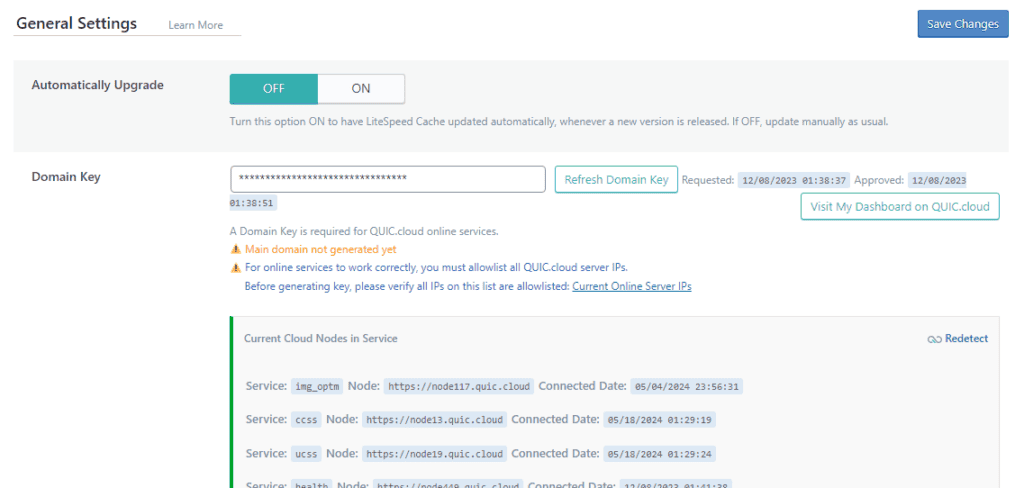
- Automatically Upgrade: OFF – It’s safer to update plugins manually.
- Domain Key: Request and add a domain key to use QUIC.cloud features as demonstrated within this article.
- Guest Mode: ON for faster load times for first-time visitors, but it consumes more resources.
- Guest Optimization: ON if Guest Mode is on for aggressive optimization.
- Server IP: Add your server’s IP address.
- Notifications: OFF – Unless you want to stay updated with LiteSpeed’s latest news and releases.
Litespeed Cache Settings
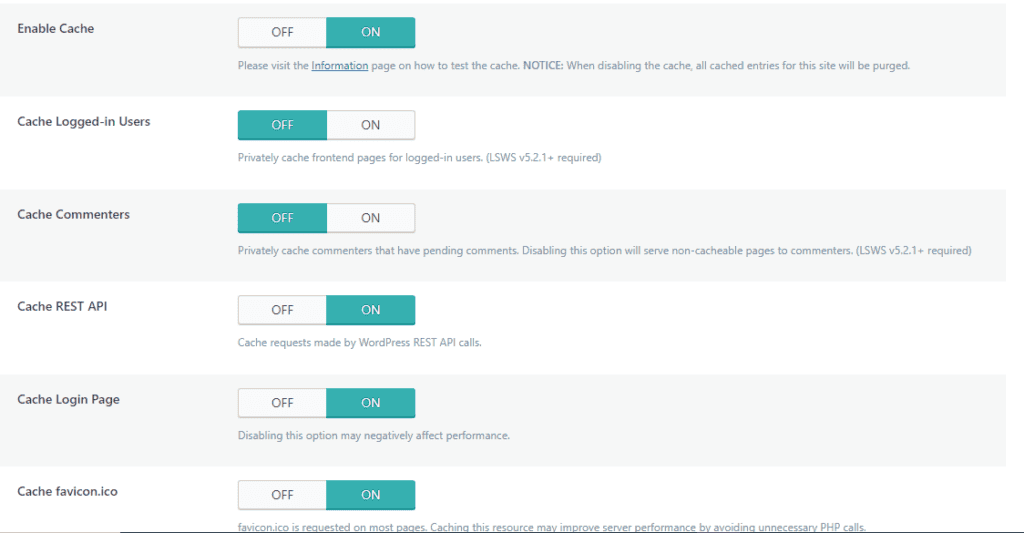
- Enable Cache: ON – Automatically cache your site for better performance.
- Cache Logged-in Users: OFF– Unless you run a membership site.
- Cache Commenters: OFF – Depends on your comment moderation settings.
- Cache REST API: ON – Necessary for many themes and plugins.
- Cache Login Page: ON – Caches the login page for faster access.
- Cache favicon.ico: ON – Caches favicon to avoid unnecessary PHP calls.
- Cache PHP Resources: ON – Caches static PHP files for better performance.
- Cache Mobile: ON – Enable for different cache content on mobile devices.
Additional Cache Settings:
- TTL: Default settings are usually fine but adjust based on content update frequency.
- Purge: ON Enable to clear outdated caches automatically during updates.
- Excludes: Specify which content types to exclude from caching.
- ESI (Edge Side Includes): OFF – Separates parts of a page for caching but is complex.
- Object Cache: Enable if your host supports Redis or Memcached for better database performance.
- Browser Cache: ON – Caches dynamic content in the user’s browser for faster loading.
Page Optimization
CSS Settings:
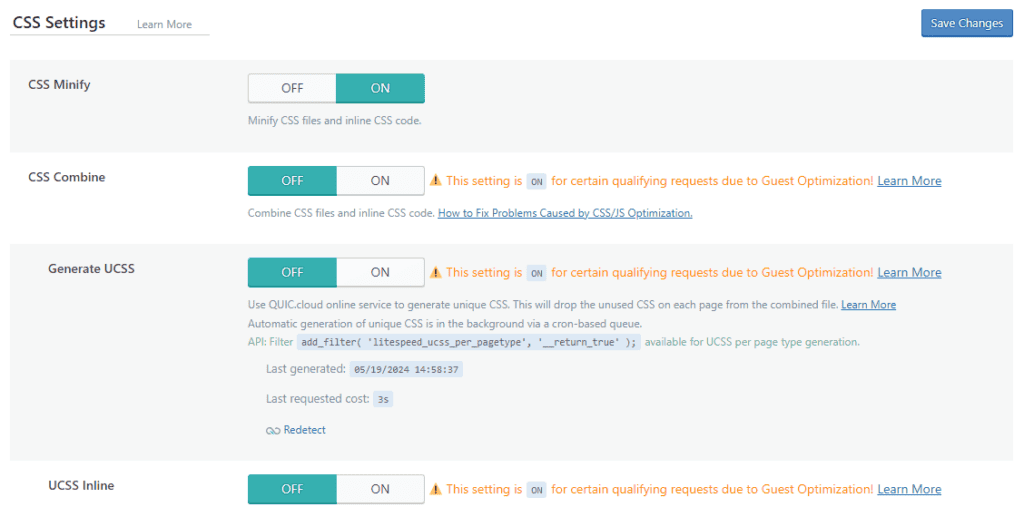
- CSS Minify: ON – Removes unnecessary characters from CSS.
- CSS Combine: OFF – Combines CSS files but can consume resources.
- Generate UCSS: OFF – Generates unused CSS, only if CSS combine is on.
- Load CSS Asynchronously: Test – Can improve speed but might cause layout shifts.
- Font Display Optimization: Default – Avoid FOUC issues.
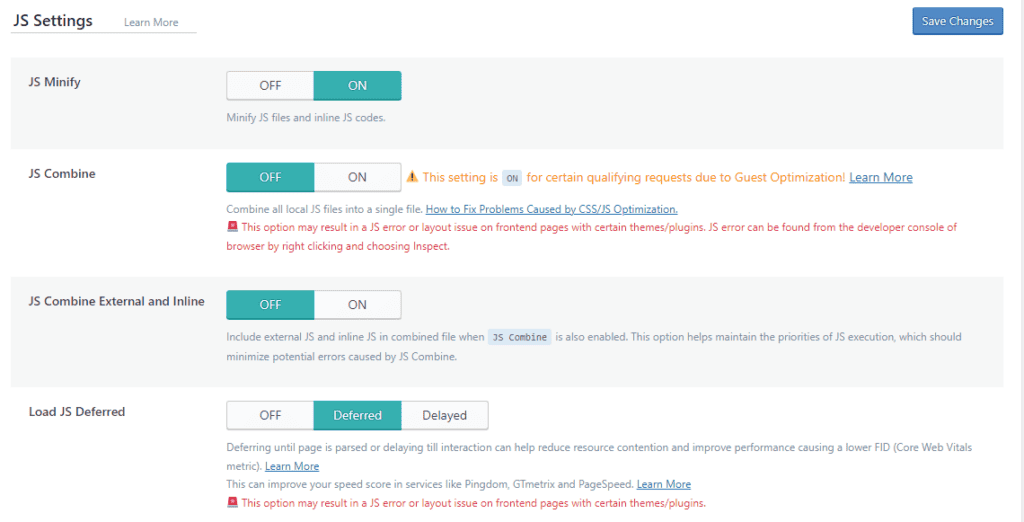
JS Settings:
- JS Minify: ON – Strips unnecessary characters from JavaScript.
- JS Combine: OFF – Combining JS files can consume resources.
- Load JS Deferred: Test – Deferring JS can improve speed but may break functionality.
HTML Settings:
- HTML Minify: ON – Strips unnecessary characters from HTML.
- DNS Prefetch: ON – Reduces page loading time by prefetching DNS.
- Remove Query Strings: OFF – Usually doesn’t impact performance.
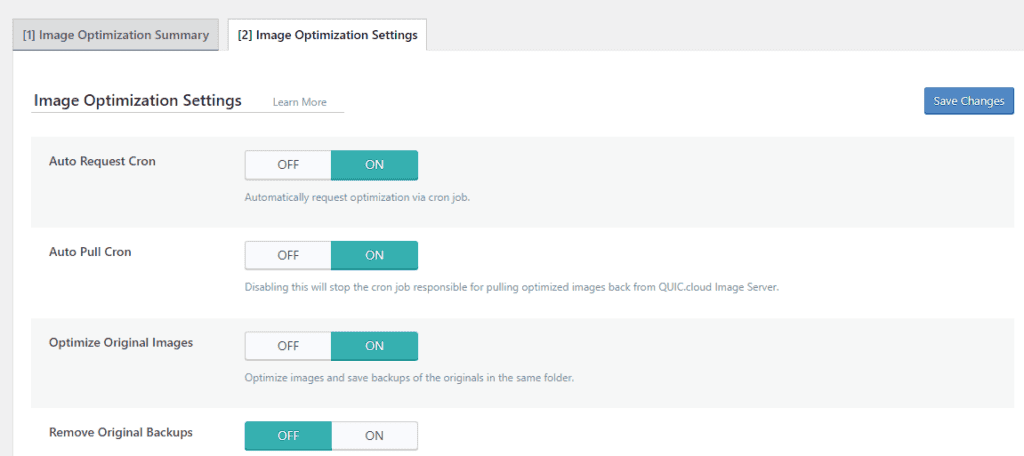
Image Optimization
- Auto Request Cron: ON – Automatically optimizes newly uploaded images.
- Auto Pull Cron: ON – Pulls optimized images automatically.
- Optimize Original Images: ON – Optimizes .png and .jpg images.
- Remove Original Backups: OFF – Keeps backups for reverting optimization if needed.
- Optimize Losslessly: ON – Uses lossless compression for images.
- Create WebP Versions: ON – Creates .webp versions for better compression.
- Image WebP Replacement: ON – Replaces .jpg and .png with .webp where supported.
4. Setting Up QUIC.cloud CDN | Cloudflare
Steps to Set Up QUIC.cloud:
- Request Domain Key: In LiteSpeed Cache settings, request a domain key and add your Server IP.
- Enable QUIC.cloud CDN: Navigate to CDN > QUIC.cloud CDN Setup > Begin Setup.
- Configure DNS: In your domain registrar, change nameservers to QUIC’s.
- Standard Plan: Use the standard plan for full features and better performance.
For a Step by Step Guide on how to do it, please refer to QUIC.cloud CDN: Setup Guide & Tips
Cloudflare Setup:
- Change DNS: Add your website to Cloudflare and update nameservers.
- Install Super Page Cache for Cloudflare Plugin: Configure it for page caching.
- Configure Cloudflare Dashboard: Set SSL/TLS, Always Use HTTPS, and other recommended settings.
For a Step by Step Guide on how to do it, please refer to Mastering Cloudflare Speed Optimization: Configuring Your WordPress site for Maximum Performance
5. Additional Litespeed Cache Settings & Features
Database Optimization
Regularly clean and optimize your database to maintain performance.
- Revisions Max Number: Limit post revisions to reduce bloat.
- Optimize Tables: Regularly optimize database tables.
Crawler
The crawler refreshes expired cache pages but consumes resources.
- Enable Crawler: Only if you manage your server.
- Configure Crawler: Set up in General settings and submit your sitemap.
Toolbox
Manage cache settings manually with Toolbox.
- Purge: Clear specific cache types.
- Import/Export: Backup and restore settings.
- Heartbeat Control: Manage WordPress Heartbeat to reduce server load.
Frequently Asked Questions About Using Litespeed Cache with WordPress
1. How do I know if LiteSpeed Cache is working properly on my site?
To verify that LiteSpeed Cache is functioning correctly:
Check Headers: Use a tool like Uptrends or your browser’s developer tools to inspect the HTTP headers of your website. Look for the header x-litespeed-cache: hit. This indicates that the page is being served from the cache.
Performance Testing: Use tools like GTmetrix, PageSpeed Insights, or WebPageTest to analyze your site’s performance before and after enabling LiteSpeed Cache. Significant improvements in load times and performance scores are indicators that the cache is working effectively.
Cache Status: Visit the LiteSpeed Cache plugin dashboard in your WordPress admin area to view cache status, including hit and miss ratios, which will give you insight into how well the caching is performing.
2. Should I use QUIC.cloud or Cloudflare for my CDN?
Both QUIC.cloud and Cloudflare are excellent CDNs, but the choice depends on your specific needs:
QUIC.cloud: This CDN is specifically optimized for LiteSpeed Cache and integrates seamlessly with LiteSpeed servers. It offers dynamic content caching and additional optimization features that work in tandem with LiteSpeed Cache.
The standard plan provides full features, including DDoS protection and access to all PoPs, making it ideal for sites looking to maximize performance.
Cloudflare: Cloudflare offers robust free plans and is known for its wide range of security features, including DDoS protection and a large network of PoPs. It’s a versatile option that works well with various web servers.
If using Cloudflare, consider the Super Page Cache for Cloudflare plugin to integrate it with LiteSpeed Cache.
Here’s a quick reference article to help you decide when to use each CDN : QUIC.cloud vs. Cloudflare: Which CDN to Choose in 2024?
3. What should I do if my site’s performance is still poor after configuring LiteSpeed Cache settings?
If your site is not performing well even after configuring LiteSpeed Cache settings:
Check Configurations: Ensure that all LiteSpeed Cache settings are configured correctly according to the guide.
Additional Plugins: Use additional optimization plugins like Perfmatters to manage bloat, preload critical resources, and disable unnecessary scripts on specific pages.
Hosting Resources: Verify that your hosting plan provides adequate resources (CPU, RAM, etc.). Upgrading to a plan with better resources or a super Fast WordPress & Woocommerce Hosting like Hostious.io might guarantee you resolve the issue.
P.S Migration to our reliable servers is Free for a limited time, Feel free to check it out and grab the offer!
Third-Party Scripts: Minimize the use of third-party scripts and plugins that may be causing delays. Use tools like Chrome DevTools to identify and address slow-loading resources.
4. Can I use both QUIC.cloud and Cloudflare together on my site?
While it is technically possible to use both QUIC.cloud and Cloudflare together, it adds complexity to your setup:
Choose One for Simplicity: It’s usually best to select one CDN to avoid potential conflicts and simplify configuration. QUIC.cloud integrates seamlessly with LiteSpeed Cache settings, while Cloudflare offers extensive features and is highly reliable.
Configuration: If you decide to use both, ensure that configurations do not overlap or conflict. For instance, use Cloudflare for static content caching and QUIC.cloud for dynamic content caching.
5. How do I optimize images for better performance with LiteSpeed Cache?
Optimizing images is crucial for improving load times and performance:
Enable Image Optimization: In the LiteSpeed Cache settings, navigate to the Image Optimization settings and enable features like Auto Request Cron and Auto Pull Cron.
WebP Conversion: Turn on the Create WebP Versions and Image WebP Replacement settings to serve lighter WebP images instead of larger PNG or JPEG files.
Lazy Loading: Enable Lazy Load Images to defer the loading of images until they are needed, improving initial load times.
LQIP (Low-Quality Image Placeholders): Consider enabling LQIP to display low-quality placeholders while high-quality images are loading, enhancing user experience without sacrificing performance.
Avoid Duplicates: Ensure that you are not using multiple image optimization plugins simultaneously, as this can cause conflicts and processing errors.
Conclusion
Properly configuring LiteSpeed Cache can drastically improve your site’s performance and Core Web Vitals. For an even better experience, consider our hosting services optimized for speed and reliability.
P.S If you’re seeking a hosting solution that complements the speed enhancements Litespeed Cache offers, consider exploring our hosting services. We specialize in providing secure, high-performance hosting environments that are optimized for WordPress and fully compatible with these Litespeed Cache settings. This synergy ensures that your site remains swift, secure, and FAST regardless of traffic spikes or security threats.


