Ultimate Guide to WordPress Content Migration: Importing and Exporting Posts and Pages Effortlessly

Moving your WordPress site to a new place can be tricky. You can’t just copy all your files and database within a WordPress content migration– It doesn’t work that way.
Good news, though! WordPress has simple “Import” and “Export” tools. These tools are good for basic stuff, but sometimes you need to do a bit more for other things.
In this guide, I’ll show you, step-by-step, how to move all your stuff – like your posts and pages – to a new WordPress site. This way, you can merge two sites or move to a new host like hostious without making a mess.
Got a WordPress or WooCommerce site? Hostious can move it for you for free, but only for a limited time. We’ll do the full move quickly and easily. You’ll get a super-fast and always-on hosting service, with help ready anytime you need it. Move to Hostious today for a hassle-free hosting experience!
Table Of Content
1. Backing Up Your Website Before Migration
Before migrating your WordPress content, it’s crucial to back up your site. This is important because:
- Every WordPress setup is unique, and this guide might not cover all scenarios.
- You are responsible for your site. If something goes wrong, like deleting important data, it’s on you. So, be careful!
- Try transferring content to a test site first to see how it goes.
Backing Up Your WordPress Files and Database
- Backing Up Files:
- Use an FTP client to access your site’s files.
- Create and download a ZIP of your site files. The process varies per FTP client but is usually straightforward.
- Ensure you securely store the downloaded backup ZIP file.
- Backing Up Your Database:
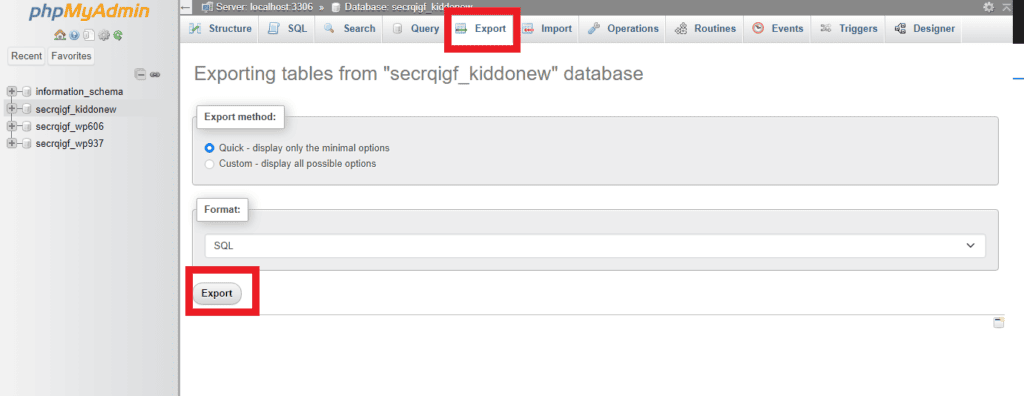
- Log into your phpMyAdmin account.
- Select the database where WordPress is installed.
- Choose ‘Export’ from the top menu. Most users can use the “Quick” export option.
- If you need to back up specific tables, choose ‘Custom’ and select the necessary tables. Leave other settings as they are.
- Click ‘Go’ to download your database backup in .sql format.
2. Exporting – WordPress content migration from old site
Exporting content is the first step in moving your WordPress site. Here’s how to do it:
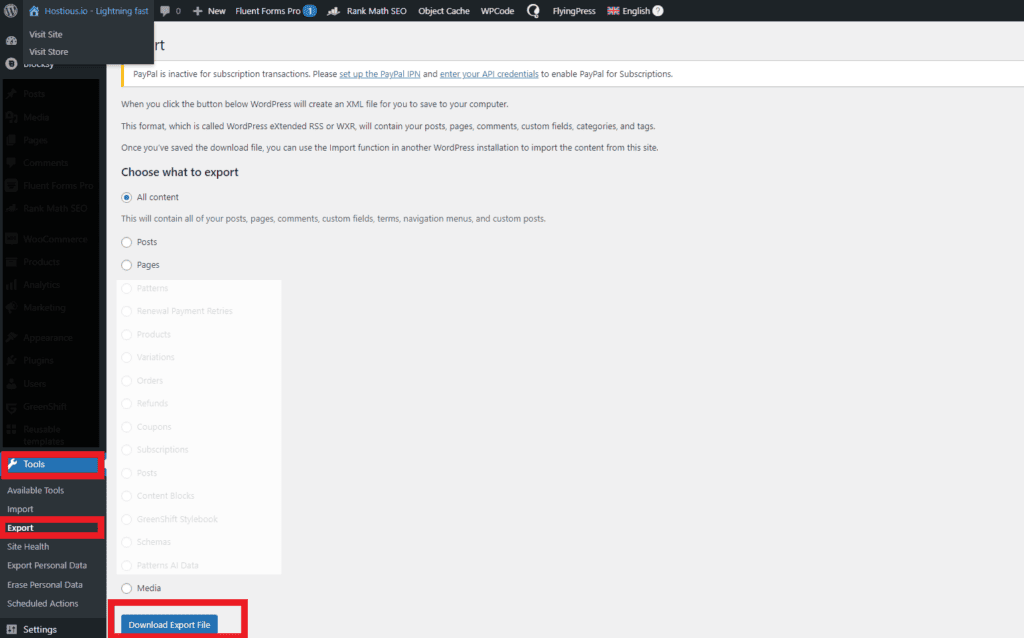
- Log In: Go to your source site’s wp-admin page. This is the site you’re moving content from.
- Find Tools: On your dashboard, hover your mouse over the “Tools” option.
- Start Export: Click on “Export.”
- Choose Content to Export: You can select what to export, like just your posts.
- Remember About Images: If you’re only exporting posts, remember that featured images won’t transfer automatically. You’ll need to add them again on the new site.
- Download the Export File: Click on “Download Export File” to get your content.
3. Importing – WordPress content migration to new site
After exporting your content, the next step is to import it into your new WordPress site:
- Log In: Access the wp-admin dashboard of your destination site (where you want to move your content).
- Access Tools: Hover over “Tools” in the dashboard.
- Start Import: Click on “Import.”
- Choose WordPress Importer: Select “WordPress” from the list. If the WordPress importer isn’t installed, you’ll be prompted to install the plugin.
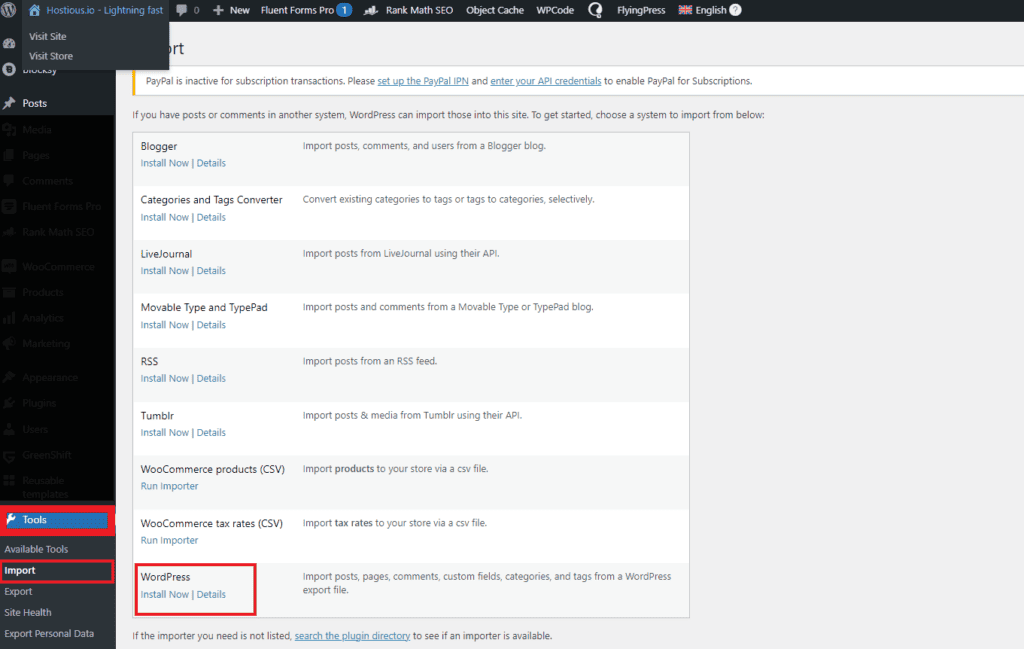
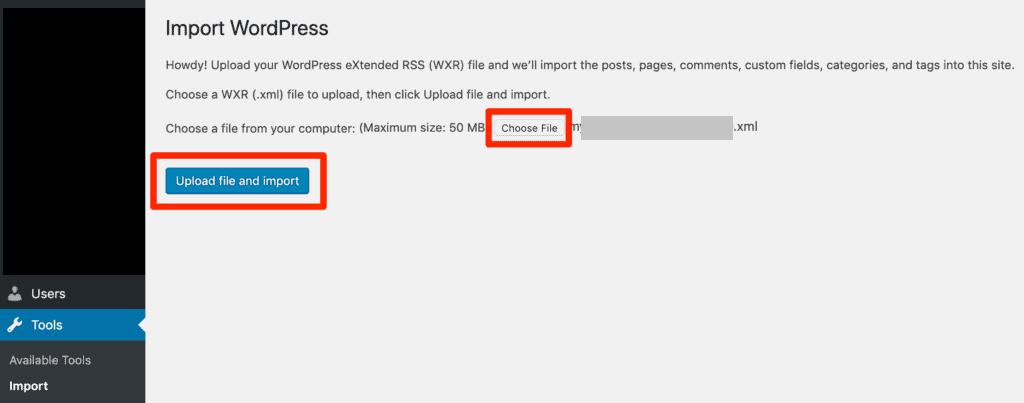
Upload Export File: Browse your computer for the XML file you exported from the source site, then select and upload it. Then Click “Upload file and import”
Assign the content: Choose an author for the imported content.
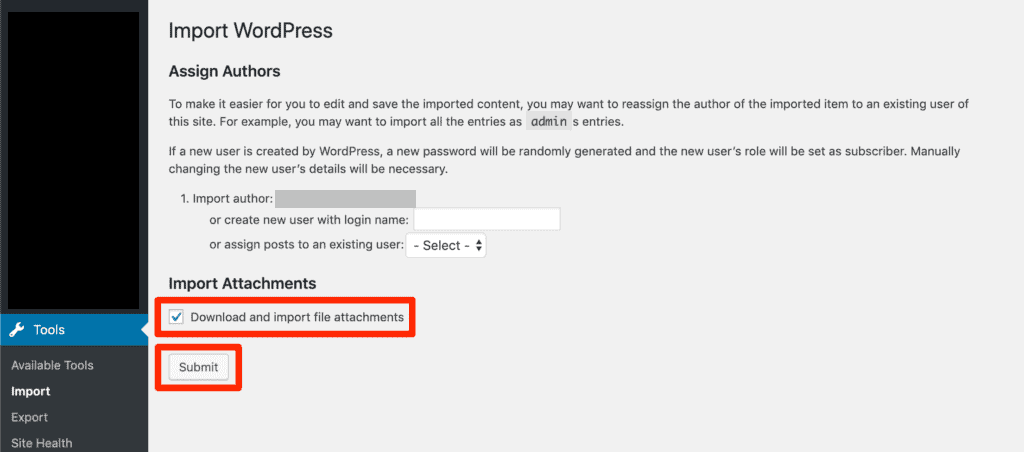
Make sure to Check ‘Download and import file attachements’ box to import photos and other media files attached to the post.
Finishing Up
In this article, we’ve narrowed our focus to cover exclusively the WordPress content migration processe. Notably, the WordPress import tool isn’t limited to just WordPress sites; it’s versatile enough to work with a variety of platforms. If you’re considering importing content from or to WordPress, here’s a list of platforms that the tool supports:
- Blogger
- Blogroll
- Categories and Tags Converter
- LiveJournal
- Medium
- Movable Type and TypePad
- Squarespace
- Tumblr
- Wix
- Xanga
Frequently Asked Questions About Migrating WordPress Posts and Pages
1. How do I access the WordPress Import Tool? Can I Protect My WordPress Site Without Using Plugins?
To access the WordPress Import Tool, log into your WordPress account and navigate to the dashboard. On the left side, locate the ‘Tools’ link in the main admin menu. Hover over ‘Tools’ to see the options for ‘Import’ and ‘Export’. Click ‘Tools’, then select ‘Import’
2. What should I do before starting the import process?
Before importing, you need to export the data from the source website. Login to that website and navigate to Dashboard > Tools > Export. Choose to export everything, which will create an .xml file containing all the data
3. What steps are involved in wordpress content migration from an old to a new Website ?
First, login to the new website and go to Tool > Import, then select WordPress. Upload the .xml file created during the export process and click on the ‘Upload file and import’ button. Assign the new content to your current WordPress username
4. How can I handle large imports causing timeouts or performance issues?
Large imports can lead to PHP and HTTP timeouts or slow down website performance. For PHP timeouts, consider working with a developer to run the import using WP-CLI or a local PHP or Bash script. For HTTP timeouts, try a faster internet connection or use WP-CLI for direct server import.
To improve performance, schedule imports during low traffic times or upgrade your hosting plan for more PHP workers. However, if the slowdown is due to MySQL being busy, adding more PHP workers may not help
5. What should I do if the import file is too large for my server??
If your server runs out of memory due to a large import file, you may see an error like “Fatal error: Allowed memory size exhausted.” You can increase the available memory by editing the php.ini file if you have the necessary permissions, or ask your hosting provider to do it.
Alternatively, you can split the large import file into smaller files and import them separately. Be aware that a failed import process might create partial content, so check for and remove duplicate data after resolving the error

