10 Simple Steps to Keep Your WordPress Site Safe in 2024 (No Plugins)

Did you know that keeping a secure wordpress site doesn’t need to be hard or full of fancy tools or extra Plugins?
Sometimes, Plugins that are supposed to help can make your site slow or even open doors for hackers. So, we at Hostious are here to show you some super easy ways to protect your site without those plugins. Let’s jump into it!
Table Of Content
1. Use Secure WP-Admin Login Credentials
One of the easiest doors for hackers into your WordPress site is through common usernames like “admin”, “administrator”, or “test”.
These typical choices can leave your site open to brute force attacks, where attackers try different password combinations to gain access.
Here’s how you can beef up your login security:
Create a Unique Administrator Account
- In your WordPress Dashboard, go to Users → Add New.
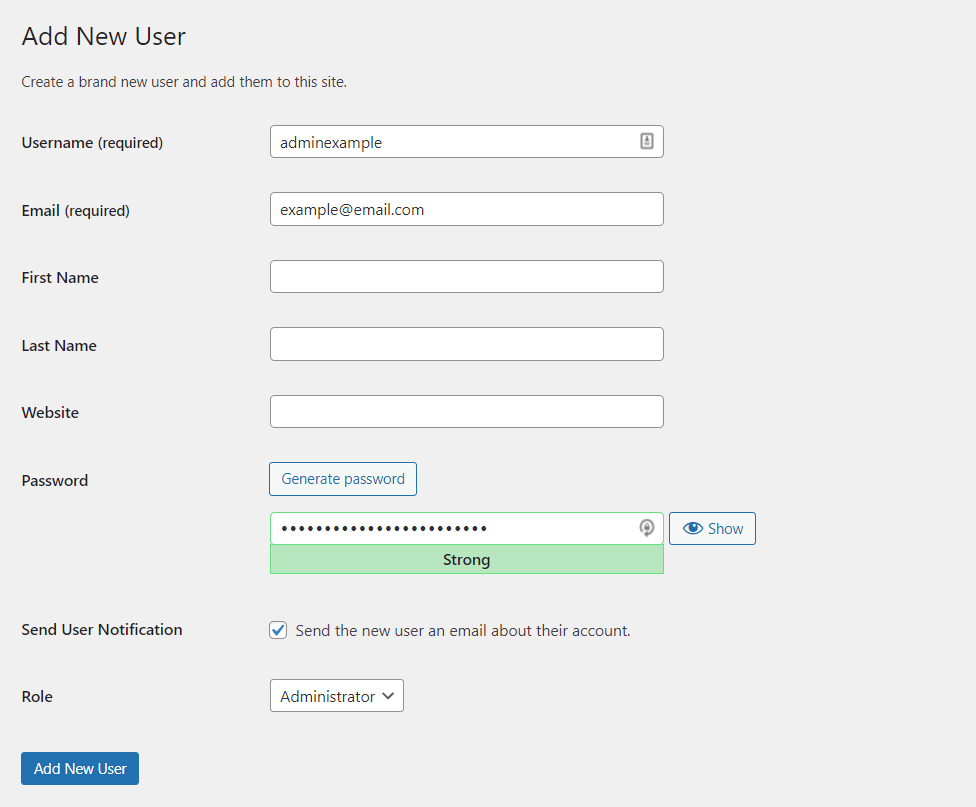
- Craft a unique username that’s not easily guessable. Avoid common names and include a mix of characters.
- Choose a strong password – think of a blend of numbers, symbols, and both uppercase and lowercase letters. Aim for more than 12 characters. A good password is like a tough puzzle; the more complex it is, the better.
Safely Remove Your Old Admin Account
- Log in with your new admin credentials.
- Head over to Users → All Users.

- Find and select your old admin account, then choose ‘Delete’ from the Bulk Actions dropdown menu and click Apply.
Important Safety Tips:
- When logging in, make sure you’re on a secure network. Public Wi-Fi like at a school or cafe can be risky as hackers might intercept your data.
- Use a VPN when on public networks for an extra layer of security. It encrypts your connection, making it tougher for hackers to sneak a peek at your login details.
2. Get Rid Of Unnecessary Themes And Plugins
keeping unused plugins can do more harm than good. If not maintained regularly, plugins and themes increase the risk of a potential cyber attack. If you want to remove unused plugins, here’s how to do it:
- Go to Plugins > Installed Plugins
- Select the checkbox to the left of the plugin name
- Click the Delete from under the name
- A follow-up window should appear with the plugin details. Click Delete

3. Regularly Export Your Content
For a thriving WordPress blog, your content – encompassing posts, pages, images, and various media – is indisputably your most valuable asset. In the face of cyber threats that could jeopardize your content, it’s crucial to have a robust backup strategy in place.
Regularly backing up your content to a local drive or a secure cloud storage solution is a smart practice. This precaution ensures that, in the event of an attack or technical glitch, your valuable content remains intact and recoverable.
Exporting your content from WordPress is straightforward:
- Navigate to the WordPress admin area and select Tools > Export.
- Click on the “Download Export File” button. WordPress will generate and offer you an XML file containing your site’s content.
- Save this file securely. In the event you need to restore your content, this file can be easily imported back into WordPress through Tools > Import in the admin area.
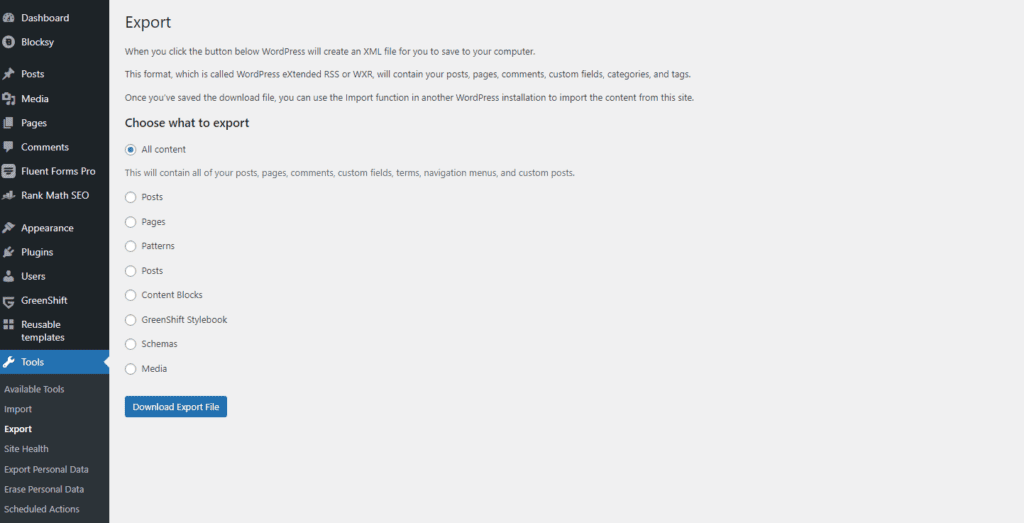
This method provides a simple yet effective way to preserve your WordPress blog’s integrity, ensuring that your content remains safe and can be swiftly restored if necessary.
4. Understanding and Managing the .htaccess File in WordPress
What is the .htaccess File?
The .htaccess file is a powerful configuration file used to manage server settings for individual directories on a web server. In WordPress, it plays a crucial role in directing the behavior of URLs, ensuring they are SEO-friendly. Crucially, this file can be edited without full administrator access to the server.
Locating the .htaccess File
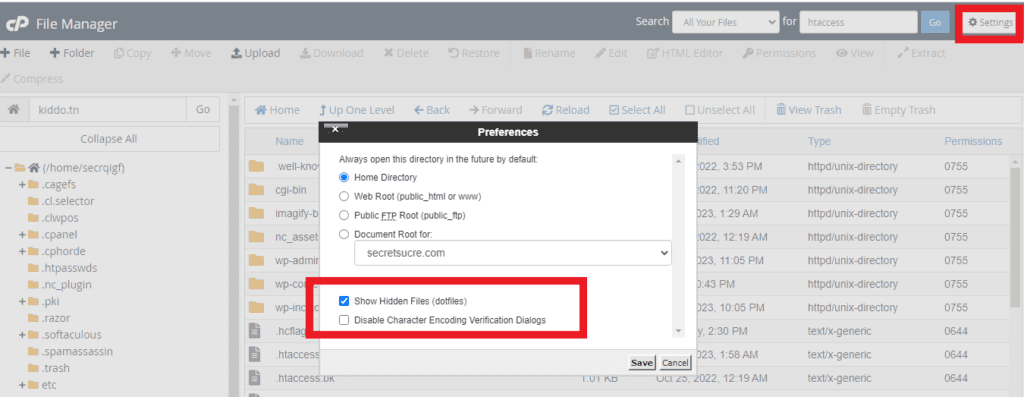
You can find this file in the root directory of your web hosting. Access it via FTP using clients like Total Commander, WinSCP, or FileZilla. If it’s not immediately visible, ensure your FTP client is set to display hidden files.
One more easy way is to do it via your Hosting panel / Cpanel by going to Settings > Check show Hidden Files.
Editing the .htaccess File
Edit the .htaccess file using any text editor, from basic Notepad to more advanced ones like PSPad Editor. Always backup the file before making changes to avoid accidental disruptions to your site.

5. Lock Down Your Admin Page
Consider using a service like Cloudflare to set up a Web Application Firewall (WAF) for added protection:
- With Cloudflare, for instance, you can set up a zone lockdown rule. It lets you decide who can access your login page based on their IP address.
- You can also manually adjust your site’s .htaccess file to limit access to your wp-login.php file. Be sure to back up your .htaccess file first!
Here’s a sample .htaccess rule for Apache servers:
For Apache 2.2:
<files /wp-login.php>
order deny,allow
allow from DIN_IP
deny from all
</files>
or Apache 2.4:
<Files "wp-login.php>
Require all denied
</Files>
- Place this code after the # BEGIN WordPress and # END WordPress comments in your .htaccess file.
Remember, blocklisting works against known threats, but it’s not foolproof. For more comprehensive security, consider safelisting, though it’s a bit more complex to set up.
6. Redirect HTTP to HTTPS Without a Plugin
Backup Your Website:
Before making any changes, ensure you have a full backup of your WordPress site. This includes your database and all your WordPress files.
Check Your Hosting for SSL :
- Verify that your hosting provider supports SSL and that you have an SSL certificate installed. Many hosts offer a free SSL certificate via Let’s Encrypt.
Hostious’s ‘cPanel importer’ tool allows you to migrate a cPanel account to Hostious and SSL certificate will be imported by default.
Update WordPress URLs :
- Go to your WordPress Dashboard.
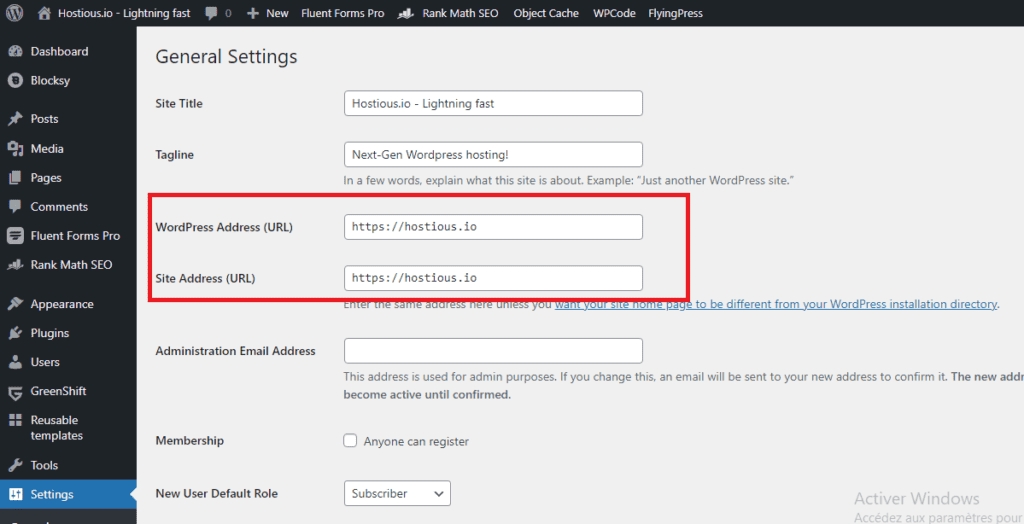
- Navigate to Settings > General.
- Update your WordPress Address (URL) and Site Address (URL) from
https://tohttps://.
- Save the changes.
Modify the .htaccess File :
- Connect to your website using an FTP client or through the file manager in your hosting control panel.
- Locate the
.htaccessfile in the root directory of your WordPress install. - If you can’t find it, make sure to enable the option to show hidden files (dotfiles).
- Download a copy of this file to your computer as a backup.
- Edit the
.htaccessfile and add the following lines at the beginning of the file to set up the redirection:
<IfModule mod_rewrite.c>
   RewriteEngine On
   RewriteCond %{HTTPS} off
   RewriteRule ^(.*)$ https://%{HTTP_HOST}%{REQUEST_URI} [L,R=301]
</IfModule>Update Links in Your Database :
- Access phpMyAdmin from your hosting control panel.
- Select your WordPress database.
- Click on the SQL tab to run a SQL query.
- To update all URLs in the posts table, use the following SQL command (replace ‘
wp_‘ with your table prefix if different):
UPDATE wp_posts SET post_content = REPLACE(post_content, 'https://yourdomain.com',
"https://yourdomain.com');
Execute the query. Repeat the process for any other tables that contain URLs, such as ‘wp_options‘ or ‘wp_postmeta‘.
Test the Redirection :
After making these changes, visit your website using https:// and ensure it automatically redirects to https://.
Update Google Analytics and Search Console :
If you use Google Analytics or Search Console, update your website’s URL to reflect the change to HTTPS.
Search for Mixed Content :
Use the browser’s inspection tool to check for mixed content warnings. Update any internal links, images, scripts, or stylesheets that are still loading over HTTP to use HTTPS instead.
By following these steps, you can switch your WordPress site from HTTP to HTTPS without a plugin, ensuring a secure connection for your visitors.
Always proceed with caution when working with your site’s database and .htaccess file, as incorrect changes can cause website downtime.
7. Disable browsing folders
To prevent the attackers from seeing what files are on your web hosting, you can disable public display of folders. This step is recommended by most security experts.
To activate,Add the following line of code anywhere in the file:
Options -IndexesThis line tells the web server to disable directory browsing. It prevents the server from listing the contents of directories.
Save and Upload (if applicable):
- After adding
Options -Indexesto your.htaccessfile, save the changes. - If you downloaded the file to edit, make sure to upload it back to the root directory of your WordPress installation.
8. Blocking Unauthorized User Scans in WordPress
A prevalent tactic among attackers targeting WordPress sites is the brute force attack. This often involves scanning for usernames, particularly author usernames, which can then be exploited to attempt password breaches. Securing your site against such scans is crucial for thwarting unauthorized access.
Implementing User Scan Block via .htaccess:
Purpose: The goal is to prevent malicious bots and attackers from scanning your site to find user or author names, which are often used in brute force attacks.
Edit and Add Custom Rules:
- Open the
.htaccessfile with a text editor. - Carefully insert the following lines of code. This snippet effectively blocks the scanning of author usernames:
# BEGIN block author scans
RewriteEngine On
RewriteBase /
RewriteCond %{QUERY_STRING} (author=\d+) [NC]
RewriteRule .* - [F]
# END block author scans
After updating the .htaccess file, test your website to ensure it’s functioning correctly and that legitimate access is not affected.
By implementing this block, you significantly enhance your WordPress site’s security, making it more resilient against one of the most common types of cyber attacks targeting user information.
9. Securing Your WordPress Site by Disabling File Editing
An essential security measure for any WordPress website is to disable the file editing feature. This prevents unauthorized modifications to your site’s core files, safeguarding it from potential misuse or malicious activities, even if access credentials fall into the wrong hands.
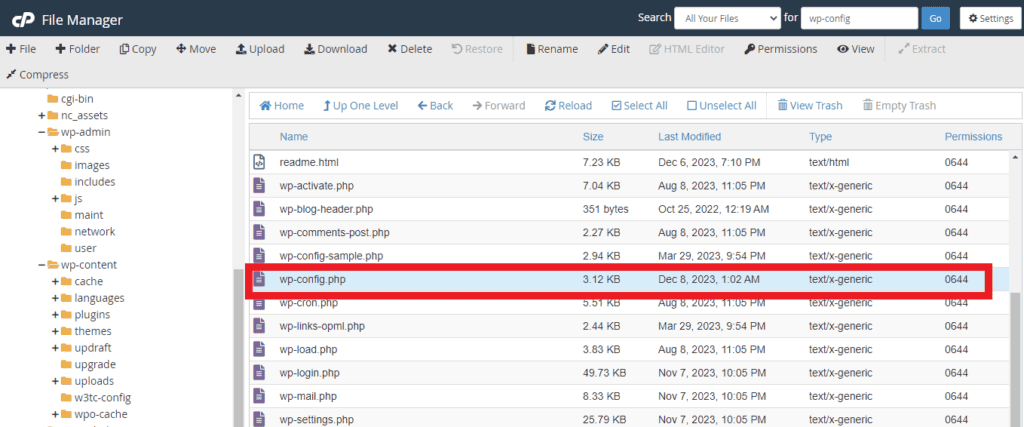
To disable file editing within the WordPress framework, you need to modify the wp-config.php file, which is a critical configuration file for your WordPress installation. Here’s how you can do it:
- Access the File Manager through your hosting control panel or connect to your site via an FTP client.
- Navigate to the root directory of your WordPress installation, usually named
public_html. - Locate the
wp-config.phpfile and open it using a text editor of your choice, such as Notepad, Notepad++, Visual Studio Code, or Sublime Text.
4. Insert the following line of code at the top of the file, just before the line that says /* That's all, stop editing! Happy blogging. */:
define( 'DISALLOW_FILE_EDIT', true ); 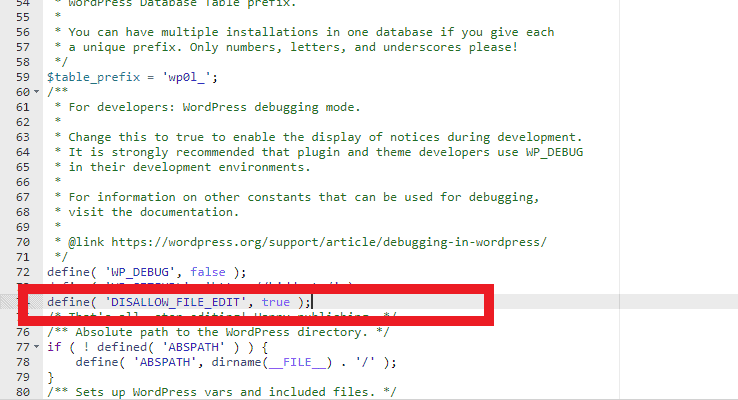
5. Save the changes to the wp-config.php file and upload it back to the server if you’re using FTP.
By implementing this change, you enhance the security of your WordPress site, making it more resilient against unauthorized modifications and potential breaches.
10. Use A Reliable & Secure Hosting Company
Fortifying your website’s defenses is crucial, especially if it has already been targeted by a brute force attack. Implementing additional layers of security such as security questions and Two-Factor Authentication (2FA) is vital to thwart further unauthorized access and mitigate potential damage.
Hostious offers a platform designed to elevate your website’s performance with robust security measures and intuitive management tools, ensuring a virtually unhackable environment.
If you’re considering a transition to Hostious, rest assured that the process is seamless. We provide comprehensive support and guidance at every stage, ensuring a smooth migration. For detailed instructions and support, please visit our Hostious Documentation.
Frequently Asked Questions About WordPress Security
1. How Can I Protect My WordPress Site Without Using Plugins?
To secure your WordPress site without relying on plugins, start with choosing a secure hosting environment. Further, apply key security practices such as managing file permissions, disabling PHP error reporting, restricting access to wp-config.php, blocking XML-RPC, and preventing hotlinking. Regular maintenance, including updates and password management, is essential. These steps can significantly bolster your site’s defenses against common vulnerabilities.
2. What Makes WordPress Vulnerable to Hacks, and How Can I Prevent It?
WordPress sites are often targeted due to their popularity and sometimes due to lackluster security measures implemented by site owners. Common vulnerabilities include outdated plugins and themes, weak passwords, and lack of proper security configurations. To prevent hacks, regularly update your WordPress core, themes, and plugins, use strong, unique passwords, and implement security best practices like SSL certificates and firewalls.
3. Why Do Browsers Sometimes Show WordPress Sites as ‘Not Secure’, and How Can I Fix This?
A browser will mark a WordPress site as ‘Not Secure’ if it lacks an SSL certificate or if the SSL is incorrectly configured. This issue can be resolved by installing an SSL certificate and ensuring your site operates over HTTPS. This not only secures the data transmission on your site but also boosts its credibility among users and search engines.
4. What Are the Best Practices for WordPress Security?
Best practices for WordPress security include using strong, unique passwords, regularly updating WordPress core, plugins, and themes, implementing an SSL certificate, and conducting routine backups. Additionally, limiting login attempts, monitoring user activity, and using security measures like two-factor authentication can further enhance security.
5. How Can I Detect and Fix Security Breaches in WordPress?
To detect security breaches, monitor unusual activity, such as unexpected changes in site content or unauthorized user logins. Use security tools to scan for vulnerabilities. If a breach is detected, change all passwords, update all site elements, and restore from a clean backup. Engaging a security professional for a thorough investigation and remediation is also advisable.

