Resolving 403 Forbidden Error: A 2024 Step-by-Step Guide
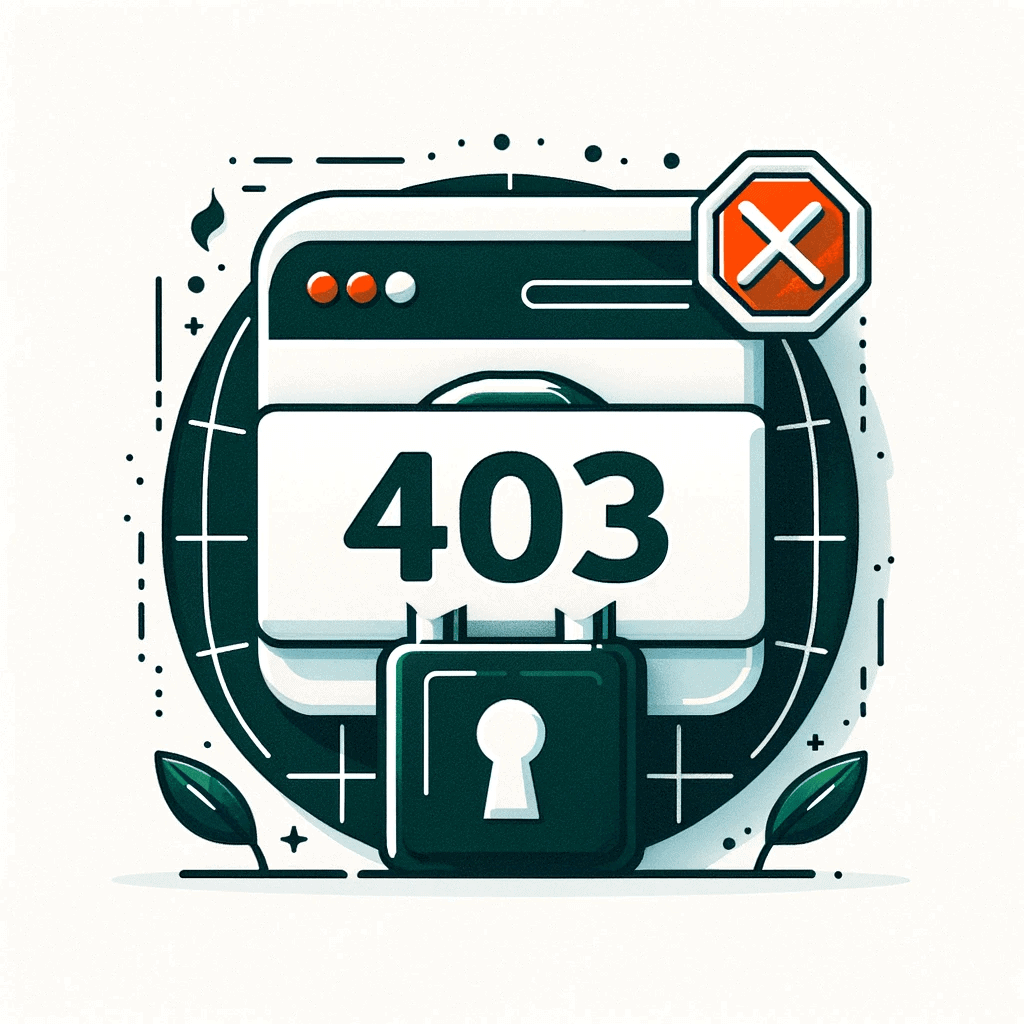
Encountering a 403 Forbidden error on your website can be a perplexing and frustrating experience. This error usually arises when your site is configured to prevent unauthorized access to certain directories or files, often due to issues related to permissions or an empty website directory. The 403 error is a clear indication that something within your site’s setup is restricting access where it possibly shouldn’t.
This guide is designed to demystify the 403 Forbidden error: what it is, why it happens, and, most importantly, how to fix it. We’ll explore ten effective strategies to resolve this common web issue, ensuring you regain full access to your website swiftly.
Table Of Content
What Causes the 403 Forbidden Error?
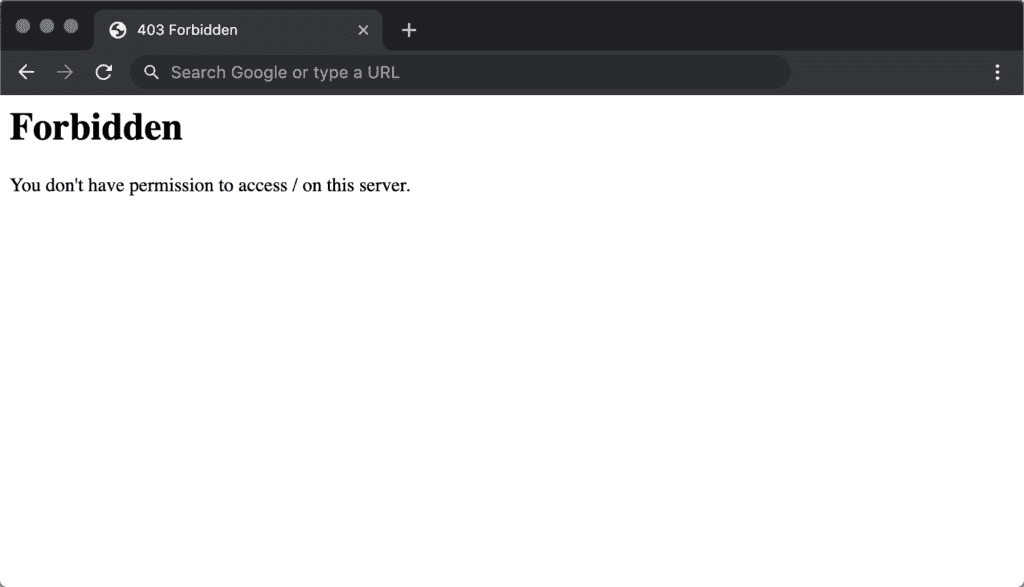
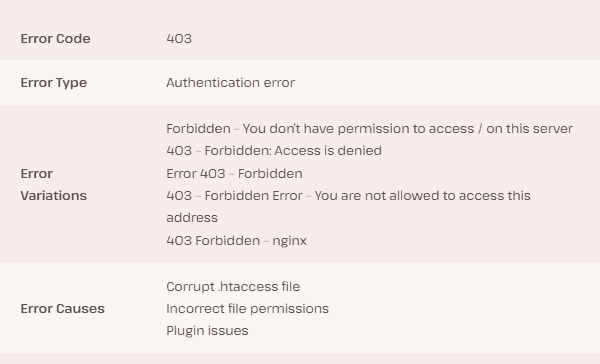
The 403 Forbidden error is a standard HTTP status code that appears when a web server understands your request but refuses to authorize access to the requested resource. This error is typically encountered in various scenarios, such as trying to access a website’s login page, a specific URL on your site, or during WordPress installation. It is one of several HTTP status codes that servers use to communicate with browsers, each indicating a different type of response or error.
Aspects of the 403 Forbidden Error :
- Permission Issues: At its core, the 403 error signifies permission problems. It suggests that your server recognizes your request but believes you lack the necessary permissions to view the page.
- Common Error Messages: The error can manifest in several ways, often accompanied by messages like:
- “Forbidden – You don’t have permission to access [directory name] on this server.”
- “403. That’s an error. Your client does not have permission to get URL [address] from this server.”
- “Access Denied – You don’t have authorization to view this page.”
- Variations may occur, but they all point to restricted access.
- Causes of the Error: Several factors can trigger this error, including:
- A corrupt
.htaccessfile. - Incorrect file permissions set on server directories or files.
- Conflicts or issues with plugins in a WordPress environment.
- A corrupt
- Server and Client Interaction: The 403 error reflects a specific type of interaction between the client (your browser) and the server. While the server understands the request, it denies access due to an authentication barrier, akin to being barred from a private event despite the host knowing who you are.
- Background on HTTP Status Codes: HTTP status codes are integral to web communication. They are server responses to browser requests, indicating everything is functioning normally (like a 200 status code) or highlighting errors (like the 403).
How to Fix the 403 Forbidden Error
In this section, we’ll guide you through ten effective methods to fix the 403 Forbidden error and regain access to your website.
1. Clear Browser’s Cache and Cookies
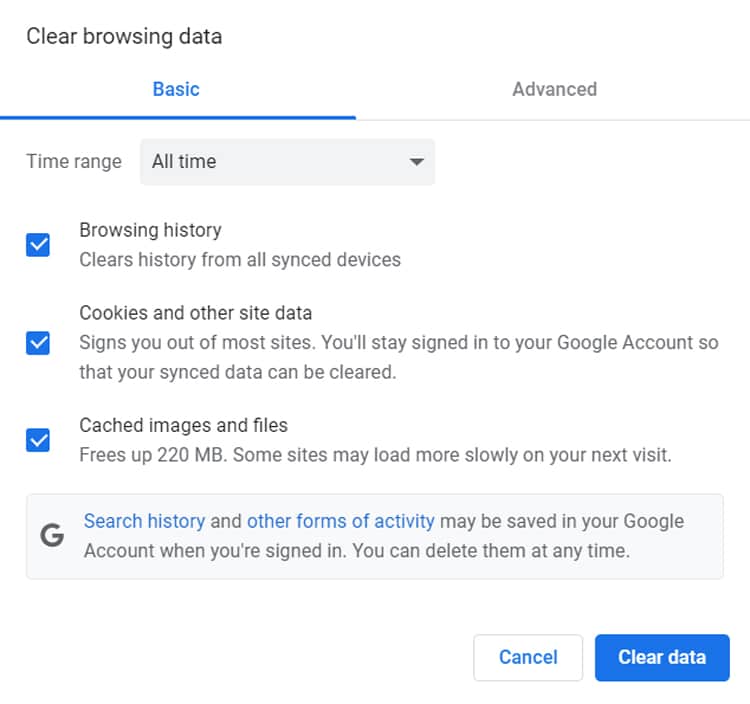
Often, the error might have already resolved itself, but you’re seeing an outdated cached version. Clearing your browser and website cache can help refresh the page and show the current state of your site.
Let’s say you went to a different browser and the web page loaded just fine. Knowing that your web page loads correctly, you return to your default browser, but the issue persists. That is because your browser displays the cached copy of that web page. To fix that, clear your browser cache via Ctrl+Shift+Del (for Windows) or Shift+Cmd+Del (for Mac).
2. Disconnect From VPN
VPNs (Virtual Private Networks) are great for masking your location and protecting your privacy online. Because they route your internet activity through somewhere other than your actual location, they also change your IP address.
This is good for privacy, but it can create access and permissions issues on certain websites.
If you’re using a VPN, try disabling it and then refresh and clear your browser’s cache.
3. Resetting Permissions for the File and Directory
Each folder and file on your site’s server has its own unique file permissions that control who can:
- Read – see the data in the file/view the contents of a folder.
- Write – modify the file/add or delete files inside a folder
- Execute – run the file and/or execute it as a script/access a folder and perform functions and commands.
These permissions are indicated by a 3-digit number, with each digit indicating the level of permission for each of the 3 categories above.
Normally, these permissions just “work” for your site.
However, if something gets messed up with the file permissions at your site, it can cause the 403 Forbidden error.
To resolve a 403 Forbidden error caused by permissions:
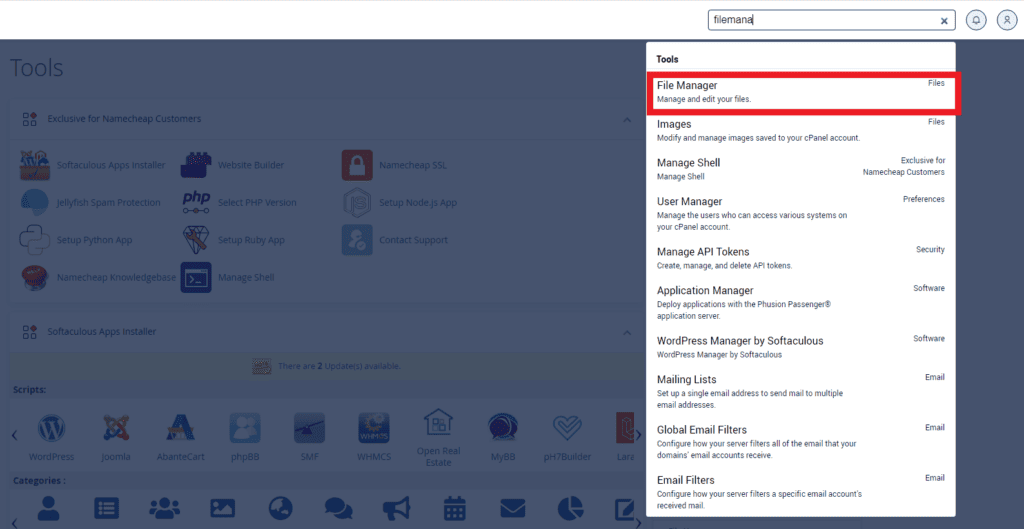
- Log in to your Hosting panel or use an FTP client to manually reset file and folder permissions
- Navigate to the Files section, then click on the File Manager icon.
3. Locate and click your website’s directory (also known as the document root) from the list. For this example, we will use public_html.
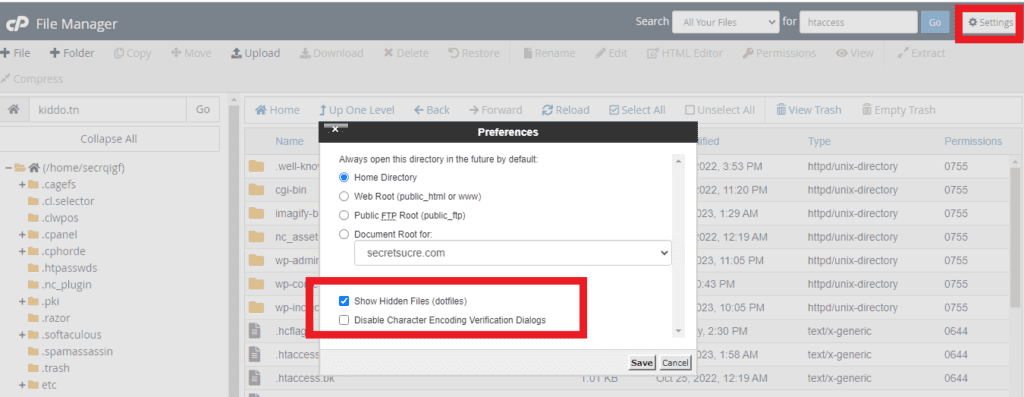
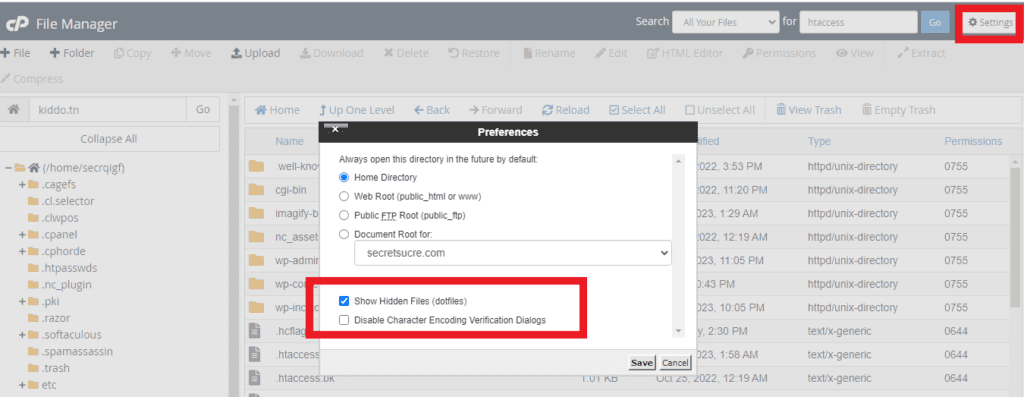
4. Once you see your website’s files and folders, click the Settings button at the top-right menu
5. In the pop-up window, select Show Hidden Files (dotfiles), then click Save
A string of 3 numbers denotes the permissions. File and folder permissions should show the following:
- WordPress site files must be 644 or 640.
- Directories and WordPress folders must be 755.
- Executable scripts within the cgi-bin folder must be 755.
- Images, media, and text files like HTML should be 755 or 644.
6. Once all files are displayed, check the Permissions column on the right. Scroll down and see if they follow the correct permissions for files and folders as stated above.
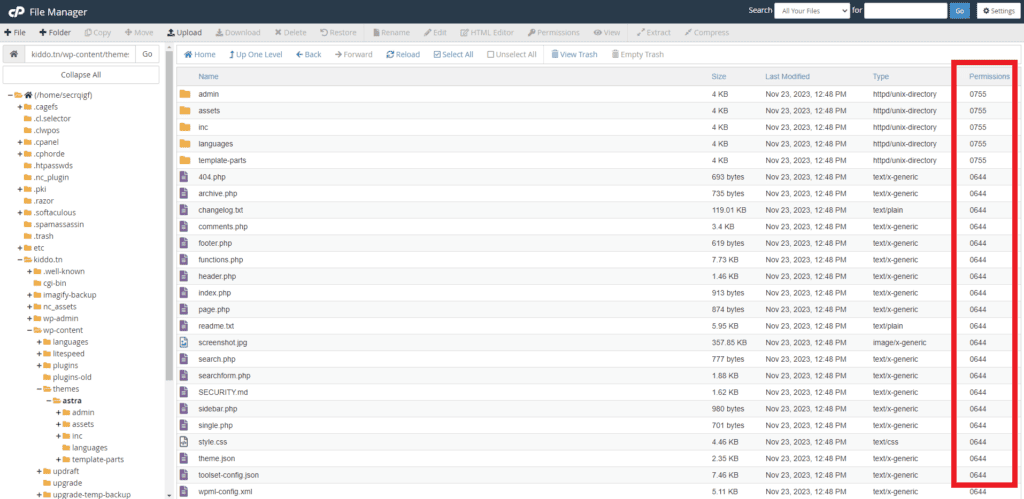
7. If any of the files or folders seem to have different permission, you may go ahead and change them to default by double-clicking the set of numbers. Click Save once done making the update.

4. Check the .htaccess File
What is the .htaccess File?
The .htaccess file is a powerful configuration file used to manage server settings for individual directories on a web server.It is a server configuration file that primarily works by altering Apache Web Server settings. It is located in your website’s public_html directory.
When addressing the 403 Forbidden error related to the .htaccess file, there are two main approaches: using the WordPress Dashboard or manually editing the file via a File Editor. Here’s how to execute both:
Via WordPress Dashboard
For WordPress sites, you can try the following approach:
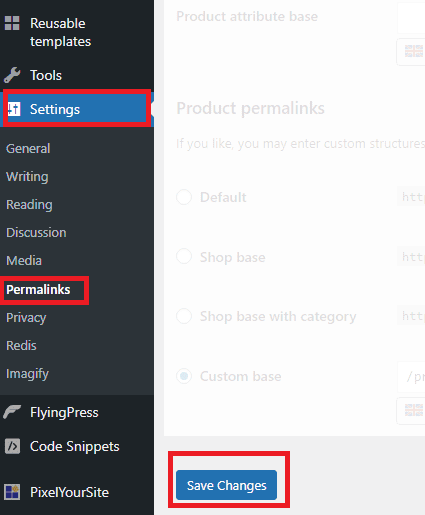
- Navigate to your WordPress dashboard and go to Settings → Permalinks.
- Simply click on Save Changes at the bottom, even if you haven’t made any modifications. This action will create a new
.htaccessfile for your WordPress site. - After doing this, revisit your website. If the 403 Forbidden error no longer shows, it’s a strong indication that the issue was with a corrupted
.htaccessserver configuration file.
Via File Editor (Manually)
Locating the .htaccess File
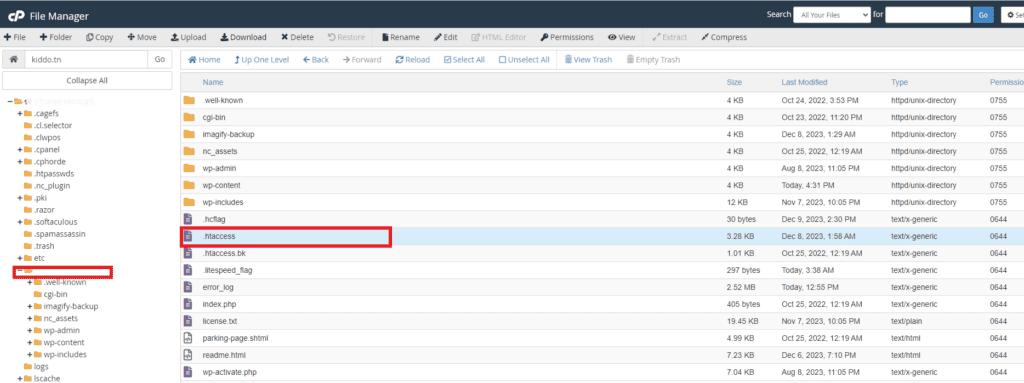
You can find this file in the root directory of your web hosting. Access it via FTP using clients like FileZilla. If it’s not immediately visible, ensure your FTP client is set to display hidden files.
One more easy way is to do it via your Hosting panel / Cpanel by going to Settings > Check show Hidden Files.
Open the public_html directory to find the .htaccess file :
Downloading a backup and creating a new .htaccess file
- Right-click on the .htaccess file and select Download to create a backup.
- After downloading the backup, delete the current .htaccess file in File Manager.
- Create a new server configuration file by clicking New file and naming it .htaccess without any extensions.
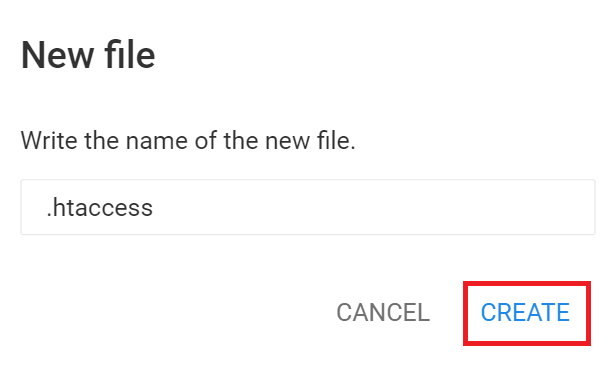
Copy the following code to the fresh file, then save it :
# Enable URL Rewriting
RewriteEngine On
# Rewrite rule to redirect requests to index.php
RewriteCond %{REQUEST_FILENAME} !-f
RewriteCond %{REQUEST_FILENAME} !-d
RewriteRule ^(.*)$ index.php?/$1 [L]
5. Find and Disable the faulty Plugin
- Bulk deactivate plugins from
Plugins > Installed Pluginsin your dashboard. Select all plugins, choose ‘Deactivate’ from the ‘Bulk actions’ dropdown, and apply.
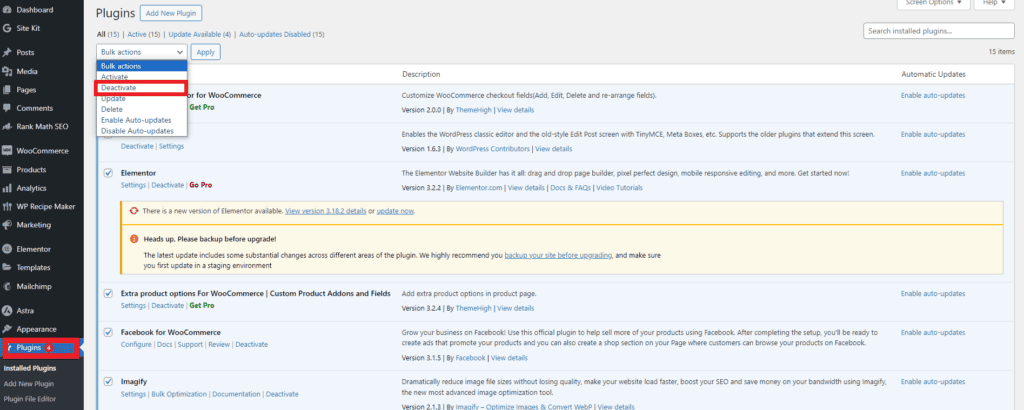
Now, try accessing your website. If the error no longer appears, a problematic plugin is the root cause of the issue.
- If dashboard access is impossible, use FTP or your hosting file manager to access rename the plugin directories in
wp-content/plugins. from “plugins” to “plugins-old” or “disabled-plugins”

Identifying the Faulty plugin:
- Revert the folder’s name to plugins to re-enable all plugins.
- Disable the plugins one by one from your WordPress dashboard and check if the site functions correctly. This step will help pinpoint the faulty plugin.
- Once identified, update the plugin or consider deleting it to fix the issue.
6. Check the Index Page
Diving deeper into diagnosing the 403 Forbidden error involves inspecting your website’s core files and permissions. The error might stem from issues with your site’s index page, which is typically named index.php or index.html. If this crucial page is missing or misnamed, it could be the root of the problem.
The simplest method is to rename the homepage as index.html or index.php via FTP or File Manager.
Alternatively, if you would prefer to retain the current name :
- Access your website files using File Manager or an FTP client.
- Upload a new file named index.html or index.php to your public_html directory.
- Open the .htaccess file.
- Insert the following code snippet to redirect index.php or index.html to your existing homepage. Be sure to replace homepage.html with the actual name of your page.
Redirect /index.html /homepage.htmlAfter configuring web server settings, try to access your website’s homepage to see if the problem is resolved.
7. Reconfigure Ownership of the File
If you’re using VPS or Linux web hosting, incorrect file ownership might be the culprit behind your 403 Forbidden error. In such environments, each file and folder is typically assigned to a specific owner and group. However, modifying these ownership details requires SSH access.
Steps to Resolve Ownership Issues:
- Access via SSH:
- Gain SSH access to your server. You’ll need to use an SSH terminal to connect to your VPS or Linux hosting environment.
- Assessing File Ownership:
- Once connected, use this SSH command to check the ownership of a file:
ls -l [file name]- The output will resemble something like:
-rwxrw-rw- 1 [owner][group] 01 Jan 24 12:00 filename.txt- Pay attention to the ‘owner’ and ‘group’ fields. The correct ownership should typically match the username of your hosting account.
3. Changing File Ownership:
- If you find that the file ownership differs from what it should be, use the
chowncommand to correct it:
chown [owner][:group] [file name]- Replace
[owner]with the correct username,[group]with the appropriate group name (if necessary), and[file name]with the actual name of the file.
Example, if your username is Marc, use the command below:
chown Marc filename.txt4. Verifying Changes:
- After changing the ownership, verify if the error persists by accessing your website again.
5. Consult Hosting Provider:
- If you’re unsure about the correct ownership details or face difficulties in changing them, it’s advisable to consult your hosting provider for assistance.
8. Verify Your A Record
A common cause of the 403 Forbidden error might be that your domain name is not correctly pointing to the intended IP address. This can happen if your domain’s A Record is inaccurately set, leading your requests to an IP address where you don’t have permission to view the content.
- Verify Current IP Address:
- Ensure that your domain name is linked to the correct IP address. This is particularly important if you’ve recently changed hosting providers.
- Update Nameservers After Hosting Migration:
- If you’ve migrated to a new web host, it’s crucial to update your domain’s nameservers. Failure to do so may result in your domain still pointing to your old host.
- Consequences of Incorrect Pointing:
- If your previous host has terminated your account and your domain still points there, it will likely trigger a 403 error. This is because the request is directed to a location where your current credentials are not recognized.
- Consult with Domain Registrar or Hosting Provider:
- If you’re unsure how to check or update your A Record, your domain registrar or hosting provider can offer guidance. They can assist in ensuring your domain points to the correct IP address associated with your new hosting account.
9. Deactivate Your CDN
If you continue to face the 403 Forbidden error even after following the previous steps, the issue might lie with your Content Delivery Network (CDN). A CDN is a network of servers distributed globally, each hosting a copy of your website to enhance performance. Many hosting plans include a CDN as a feature to optimize site speed and accessibility.
To determine whether your CDN is responsible for the error, try temporarily disabling it. This can typically be done by logging into your hosting account and navigating to the CDN settings section. If you encounter difficulties in accessing or modifying your CDN settings, reaching out to your hosting provider for assistance is advisable. They can provide the necessary support to troubleshoot the issue and guide you on how to effectively disable the CDN for testing purposes.
10. Update Nameservers
If you’ve recently switched hosting providers. Failing to update your nameservers after a migration can result in your domain still pointing to your old host. When your previous hosting provider cancels or suspends your account, it may trigger a 403 Forbidden error as your site tries to access resources on a server where it’s no longer hosted.
- Access Your Domain Registrar Account:
- Log in to the account where your domain is registered. This might be separate from your hosting account, depending on your setup.
- Locate Domain Management Section:
- Navigate to the area of the dashboard where you can manage your domain settings. Look for sections labeled as ‘Domain Management’, ‘DNS Settings’, or similar.
- Find Nameserver Settings:
- Within the domain management area, locate the settings or options for ‘Nameservers’. This is typically where you can view and edit your domain’s current nameserver information.
- Enter New Nameserver Details:
- Replace the existing nameserver details with the ones provided by your new hosting provider. These are usually found in your hosting account’s dashboard or welcome email.
- Save Changes:
- After updating the nameservers, make sure to save the changes. It’s important to double-check for any typos to ensure a correct update.
- Wait for Propagation:
- Nameserver changes can take up to 48 hours to propagate worldwide. During this time, your website may be intermittently available or unavailable.
- Verify the Update:
- After the propagation period, check that your domain correctly points to your new host. You can use online tools like ‘DNS Checker’ to confirm that the nameserver update has been successful.
Best Practices for Preventing 403 Forbidden Errors
Ensuring your website runs smoothly involves implementing strategies to prevent the occurrence of 403 Forbidden errors. Here are some best practices that can significantly reduce the risk of encountering this error:
Regular Security Audits
- Conducting regular security audits is vital to identify and address vulnerabilities.
- Focus on reviewing file and folder permissions, server configurations, and the effectiveness of security plugins.
- Proper configuration of file and directory access rights and a robust authentication system are crucial.
- Regularly check your .htaccess file to prevent unauthorized changes.
Documentation of Access Controls and Permissions
- Maintain clear records of user roles and their permissions, including administrators, editors, and contributors.
- Document permissions for files, directories, and plugins, specifying who can read, write, and execute these resources.
- This documentation helps ensure that only authorized individuals access sensitive areas, preventing unauthorized access and errors.
Updating Web Server Software and Applications
- Regular updates of your web server software (like Apache, NGINX, or LiteSpeed) are essential for security and performance.
- Keep your CMS, plugins, and applications updated to avoid vulnerabilities and compatibility issues that can lead to 403 errors.
Frequently Asked Questions About 403 Forbidden Errors
1. How Can I Identify the Root Cause of a 403 Forbidden Error?
Begin by checking file permissions; they should be set to 644 for files and 755 for directories. Next, inspect the .htaccess file for any syntax errors or misconfigurations. If you’re using a CDN, temporarily disabling it can help identify if it’s the source of the issue. Additionally, review any recent changes to plugins, themes, or server configurations. Using tools like FileZilla for FTP access or server logs can also provide insights into the error’s origin.
2. Is a 403 Error Always Due to Server-Side Issues?
Primarily, yes. The 403 Forbidden Error is often linked to server-side configurations like file permissions, .htaccess settings, or server security protocols. However, client-side factors like browser cache or local network settings can sometimes contribute. Clearing browser cache or checking the website from a different network can help rule out these factors.
3. Can Specific Hosting Configurations Lead to 403 Errors?
Yes. Hosting configurations, especially on VPS or dedicated servers, can lead to 403 errors if not set up correctly. This includes improper file ownership settings or security modules like mod_security that might be overly restrictive. Consulting with your hosting provider or a server administrator can be crucial in these cases.
4. How Do Content Management Systems Like WordPress Influence 403 Errors?
In CMS platforms like WordPress, 403 errors can arise from plugin or theme conflicts, incorrect file permissions within the WordPress directory, or issues with the WordPress core files. Ensuring that themes and plugins are compatible and updated, and regularly maintaining WordPress installations, can help prevent these errors.
5. Can Incorrect DNS Settings Cause 403 Forbidden Errors?
While less common, improper DNS configurations can lead to a range of access issues, including 403 errors. This typically happens when the DNS fails to correctly point to the server where the site is hosted, especially after site migrations. Ensuring that DNS settings, particularly A records and nameservers, are correctly configured is important in resolving and preventing these errors.


